用Gemini 3 pro简单实现了学生管理系统的网页设计
今天用Gemini 3 pro实现了一个网页。一共分为两步:
第一步,登录界面,Prompt如下:
你是一位前端开发工程师,我代表学校请你制作一个学生管理系统的网页,网页界面尽量简洁,登录窗口要居于正中间,且分为两种模式:管理员与学生。
代码如下:
<!DOCTYPE html>
<html lang="zh-CN">
<head>
    <meta charset="UTF-8">
    <meta name="viewport" content="width=device-width, initial-scale=1.0">
    <title>学生管理系统 | 登录</title>
    <style>
        /* --- 基础重置 --- */
        * {
            box-sizing: border-box;
            margin: 0;
            padding: 0;
            font-family: 'Segoe UI', Roboto, 'Helvetica Neue', Arial, sans-serif;
        }

        /* --- 整体布局:背景与居中 --- */
        body {
            background-color: #f0f2f5; /* 柔和的浅灰背景,保护视力 */
            display: flex;
            justify-content: center; /* 水平居中 */
            align-items: center;     /* 垂直居中 */
            height: 100vh;           /* 占满全屏高度 */
        }

        /* --- 登录卡片容器 --- */
        .login-card {
            background: white;
            width: 380px;
            border-radius: 12px;
            box-shadow: 0 8px 24px rgba(0, 0, 0, 0.1); /* 悬浮感阴影 */
            overflow: hidden;
            transition: all 0.3s ease;
        }

        /* --- 顶部切换标签 (Tabs) --- */
        .tabs {
            display: flex;
            cursor: pointer;
            background-color: #f8f9fa;
        }

        .tab-item {
            flex: 1;
            text-align: center;
            padding: 18px 0;
            color: #6c757d;
            font-weight: 500;
            transition: 0.3s;
            border-bottom: 2px solid transparent;
        }

        /* 激活状态的标签样式 */
        .tab-item.active {
            color: #1a73e8; /* 科技蓝,代表理性和专业 */
            background-color: white;
            border-bottom: 2px solid #1a73e8;
        }

        /* --- 表单区域 --- */
        .form-container {
            padding: 30px;
        }

        .title {
            text-align: center;
            margin-bottom: 25px;
            color: #333;
            font-size: 1.2rem;
        }

        /* --- 输入框组 --- */
        .input-group {
            margin-bottom: 20px;
        }

        .input-group label {
            display: block;
            margin-bottom: 8px;
            color: #555;
            font-size: 0.9rem;
        }

        .input-group input {
            width: 100%;
            padding: 12px;
            border: 1px solid #ddd;
            border-radius: 6px;
            outline: none;
            transition: border-color 0.3s;
        }

        .input-group input:focus {
            border-color: #1a73e8;
        }

        /* --- 登录按钮 --- */
        .btn-login {
            width: 100%;
            padding: 12px;
            background-color: #1a73e8;
            color: white;
            border: none;
            border-radius: 6px;
            font-size: 1rem;
            cursor: pointer;
            transition: background-color 0.3s;
        }

        .btn-login:hover {
            background-color: #1557b0;
        }

        /* --- 底部版权 --- */
        .footer {
            text-align: center;
            margin-top: 20px;
            font-size: 0.8rem;
            color: #aaa;
        }
    </style>
</head>
<body>

    <div class="login-card">
        <div class="tabs">
            <div class="tab-item active" onclick="switchMode('student')" id="tab-student">学生登录</div>
            <div class="tab-item" onclick="switchMode('admin')" id="tab-admin">管理员登录</div>
        </div>

        <div class="form-container">
            <h2 class="title" id="form-title">欢迎同学</h2>

            <form id="loginForm" onsubmit="handleLogin(event)">
                <div class="input-group">
                    <label for="username" id="label-username">学号</label>
                    <input type="text" id="username" placeholder="请输入您的学号" required>
                </div>

                <div class="input-group">
                    <label for="password">密码</label>
                    <input type="password" id="password" placeholder="请输入密码" required>
                </div>

                <button type="submit" class="btn-login">立即登录</button>
            </form>

            <div class="footer">© 2024 学校教务处管理系统</div>
        </div>
    </div>

    <script>
        // 当前模式:默认为学生
        let currentMode = 'student';

        // 切换模式函数
        function switchMode(mode) {
            currentMode = mode;

            // 获取DOM元素
            const studentTab = document.getElementById('tab-student');
            const adminTab = document.getElementById('tab-admin');
            const formTitle = document.getElementById('form-title');
            const usernameLabel = document.getElementById('label-username');
            const usernameInput = document.getElementById('username');

            // 切换 Tab 样式
            if (mode === 'student') {
                studentTab.classList.add('active');
                adminTab.classList.remove('active');

                // 更新文案
                formTitle.textContent = "欢迎同学";
                usernameLabel.textContent = "学号";
                usernameInput.placeholder = "请输入您的学号";
            } else {
                adminTab.classList.add('active');
                studentTab.classList.remove('active');

                // 更新文案
                formTitle.textContent = "管理员后台";
                usernameLabel.textContent = "工号/用户名";
                usernameInput.placeholder = "请输入管理员账号";
            }
        }

        // 模拟登录处理(实际开发中这里会连接后端API)
        function handleLogin(event) {
            event.preventDefault(); // 阻止表单默认提交刷新
            const username = document.getElementById('username').value;
            const role = currentMode === 'student' ? '学生' : '管理员';

            alert(`正在尝试登录...\n角色: ${role}\n账号: ${username}`);
            // 后续逻辑:发送 fetch 请求给服务器验证
        }
    </script>
</body>
</html>
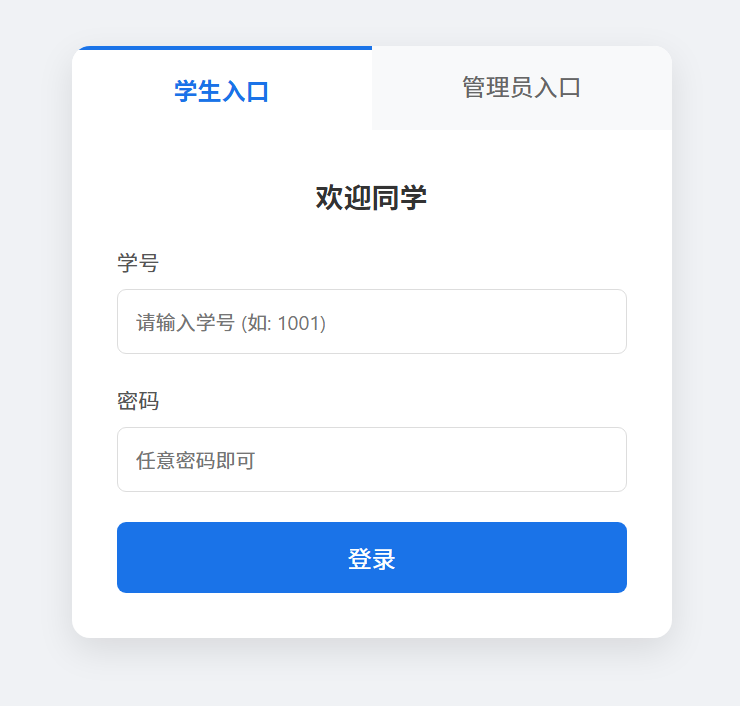
这是代码运行后呈现出的效果:
第二步,实现信息录入功能,Prompt如下:
我还想实现储存学生信息的功能,然后我作为管理员也能随时查看。
部分关键功能代码如下:
/* --- 表格样式 (管理员用) --- */
        table { width: 100%; border-collapse: collapse; margin-top: 10px; }
        th, td { padding: 12px 15px; text-align: left; border-bottom: 1px solid #eee; }
        th { background-color: #fafafa; color: #555; font-weight: 600; }
        tr:hover { background-color: #f8f9fa; }
        .status-badge { background: #e6f4ea; color: #1e8e3e; padding: 4px 8px; border-radius: 4px; font-size: 0.8rem; }

        /* --- 提示框 --- */
        .alert { padding: 15px; background: #e8f0fe; color: #1a73e8; border-radius: 6px; margin-bottom: 20px; }
    </style>
</head>
<body>

    <div class="container" id="view-login">
        <div class="login-tabs">
            <div class="tab-item active" onclick="switchLoginMode('student')" id="tab-student">学生入口</div>
            <div class="tab-item" onclick="switchLoginMode('admin')" id="tab-admin">管理员入口</div>
        </div>
        <div class="content-body">
            <h3 style="text-align:center; margin-bottom:20px;" id="login-title">欢迎同学</h3>
            <form onsubmit="handleLogin(event)">
                <div class="form-group">
                    <label id="label-user">学号</label>
                    <input type="text" id="login-id" class="form-input" placeholder="请输入学号 (如: 1001)" required>
                </div>
                <div class="form-group">
                    <label>密码</label>
                    <input type="password" class="form-input" placeholder="任意密码即可" required>
                </div>
                <button class="btn-primary">登录</button>
            </form>
        </div>
    </div>

    <div class="container" id="view-student">
        <div class="navbar">
            <h2>🎓 学生个人中心</h2>
            <span class="btn-logout" onclick="logout()">退出登录</span>
        </div>
        <div class="content-body">
            <div class="alert">
                👋 你好,<span id="student-id-display"></span>。请完善您的个人信息,管理员将从后台同步查看。
            </div>
            <form onsubmit="saveStudentInfo(event)">
                <div class="form-group">
                    <label>姓名</label>
                    <input type="text" id="stu-name" class="form-input" placeholder="请输入您的姓名" required>
                </div>
                <div class="form-group">
                    <label>专业</label>
                    <input type="text" id="stu-major" class="form-input" placeholder="例如:计算机科学" required>
                </div>
                <div class="form-group">
                    <label>联系电话</label>
                    <input type="text" id="stu-phone" class="form-input" placeholder="请输入手机号" required>
                </div>
                <button class="btn-primary">保存/更新信息</button>
            </form>
        </div>
    </div>

    <div class="container" id="view-admin">
        <div class="navbar">
            <h2>🛡️ 教务管理后台</h2>
            <span class="btn-logout" onclick="logout()">退出登录</span>
        </div>
        <div class="content-body">
            <div style="display:flex; justify-content:space-between; margin-bottom:15px;">
                <h3>学生信息列表</h3>
                <button onclick="clearAllData()" style="padding:5px 10px; border:1px solid #ddd; background:white; cursor:pointer;">清空数据</button>
            </div>

            <table id="admin-table">
                <thead>
                    <tr>
                        <th>学号</th>
                        <th>姓名</th>
                        <th>专业</th>
                        <th>电话</th>
                        <th>状态</th>
                    </tr>
                </thead>
                <tbody id="student-list-body">
                    </tbody>
            </table>
            <p id="no-data-hint" style="text-align:center; color:#999; margin-top:20px; display:none;">暂无数据,请先让学生登录录入信息。</p>
        </div>
    </div>
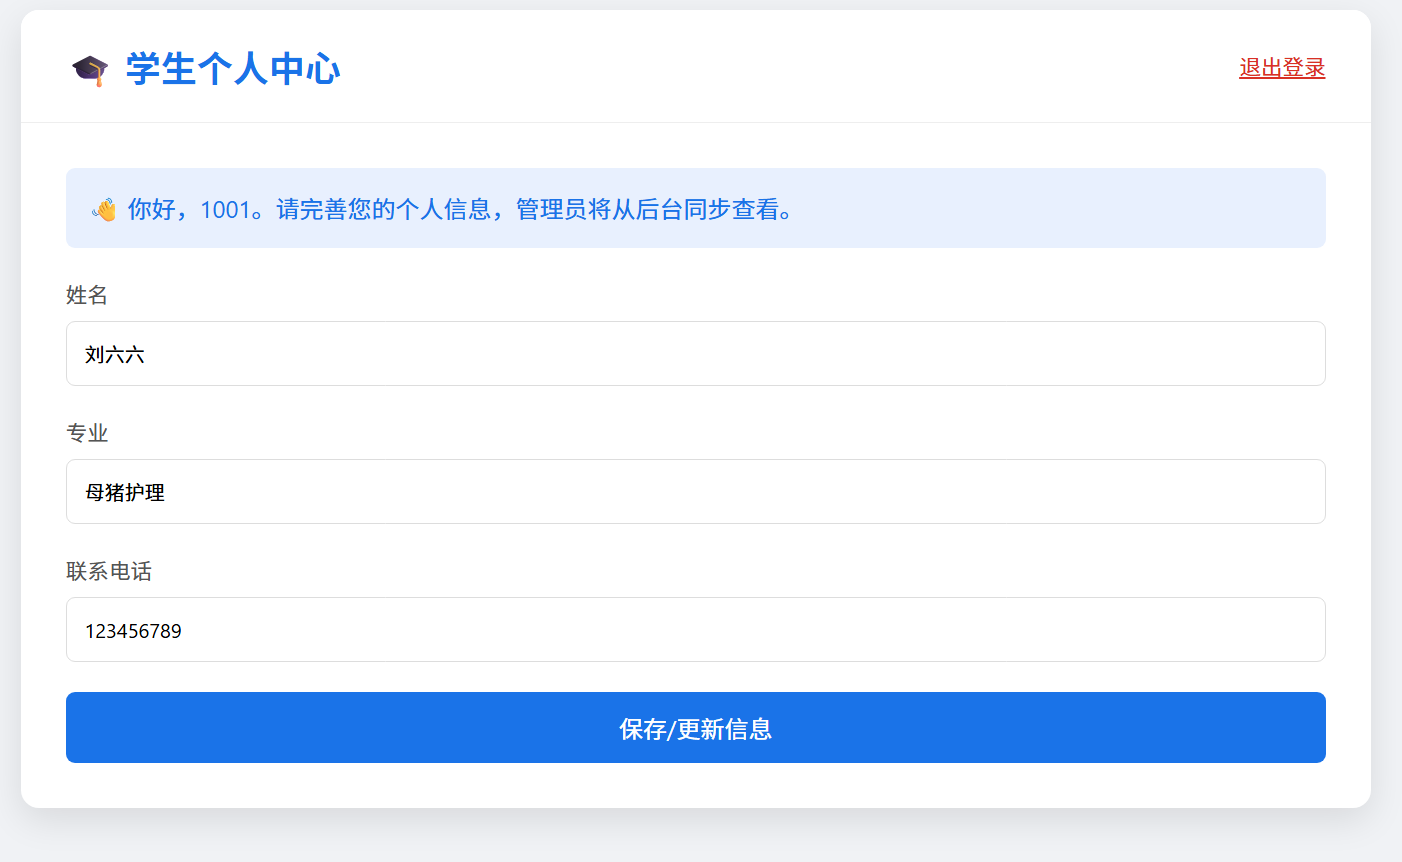
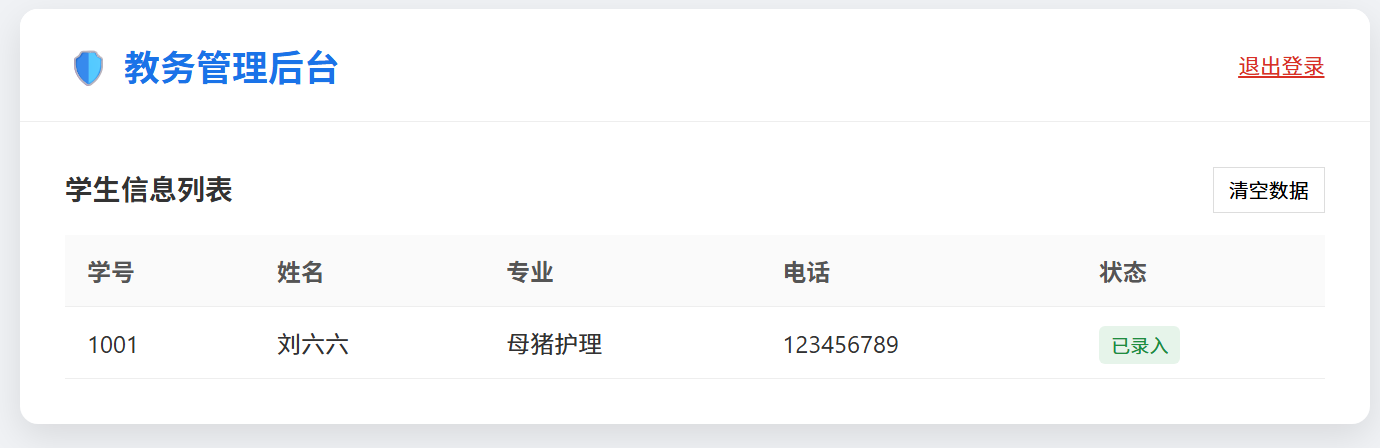
效果如图所示:
最后,问Gemini一个问题:
这个系统能储存多少位同学的信息?以下是它的回答:
这是一个非常专业且切中要害的问题!
作为一个前端工程师,我为您详细分析一下基于 Local Storage(我们目前使用的存储方式)的容量极限。
结论先行:
理论上可以存储 10,000 到 20,000 名 同学的信息。
但在实际使用中,为了保证网页流畅不卡顿,建议控制在 1,000 到 2,000 名 以内。
🧮 详细计算过程
浏览器给 Local Storage 分配的空间通常是 5MB(约 5,242,880 字节)。这是一块硬性的储存天花板。
我们可以算一笔账:
-
单个学生的数据大小:
假设我们存储的一条学生数据是这样的 JSON 格式:
JSON{"id":"20240101","name":"王大锤","major":"计算机科学与技术","phone":"13800138000","updateTime":"2024/1/31 10:20:00"}加上标点符号和字段名,这一条数据大约占用 150 ~ 200 字节(如果是全英文会更省,全中文会稍占空间)。
-
极限容量计算:
$$5,242,880 \text{ 字节} \div 200 \text{ 字节/人} \approx 26,214 \text{ 人}$$
所以,理论极限是 2.6 万人。
⚠️ 为什么建议控制在 2000 人以内?
虽然硬盘存得下,但浏览器的运行性能会受影响:
-
读写速度(I/O 性能):
Local Storage 是“同步”读取的。每次您打开页面或保存数据,浏览器都需要把这 5MB 的大字符串整体读取出来并解析。如果数据量太大(比如存满 2万 人),点击保存时,页面可能会**“卡死”半秒钟**。
-
数据安全风险:
-
清空缓存即丢失:如果用户手滑点击了浏览器的“清除浏览数据/缓存”,或者使用了电脑清理软件,这 1 万人的数据瞬间就没了。
-
设备限制:数据只存在当前这台电脑的浏览器里。换台电脑(或者换个浏览器)是看不到数据的。
-
💡 总结与建议
-
适用场景:
-
✅ 学校的一个年级(几百人)。
-
✅ 一个班级或社团(几十人)。
-
✅ 课程作业、毕业设计演示、短期临时记录。
-
-
不适用场景:
-
❌ 全校历史档案(几万人)。
-
❌ 需要多名管理员在不同电脑上共同管理。
-
❌ 需要存储学生照片(照片非常占空间,存几张就满了)。
-
🔧 如果您需要存更多人,我有两个升级方案:
-
方案 A(前端升级版 - IndexedDB):
使用浏览器自带的数据库 IndexedDB。
-
容量:可以存 几百兆甚至几个G(几十万学生没问题)。
-
优点:依然不需要后端服务器,纯网页实现。
-
缺点:代码会复杂很多。
-
-
方案 B(标准开发版 - 云数据库):
接入后端数据库(如 Firebase, MySQL 等)。
-
容量:无限。
-
优点:数据永不丢失,多端同步。
-
缺点:需要购买服务器或云服务,有开发成本。
-
对于目前的学校演示或作业需求,当前的 Local Storage 版本(存几千人)通常是绰绰有余的。

这里是“一人公司”的成长家园。我们提供从产品曝光、技术变现到法律财税的全栈内容,并连接云服务、办公空间等稀缺资源,助你专注创造,无忧运营。
更多推荐


 18
18 0
0- 0


 已为社区贡献1条内容

所有评论(0)