图片变清晰API + 智能抠图API组合实战:模糊生活照一键生成高清证件照(附Python完整工作流)
图片变清晰API + 智能抠图API组合实战:模糊生活照一键生成高清证件照(附Python完整工作流)
一、为什么需要组合两个API?
用户上传的生活照通常存在两大问题:画质模糊和背景杂乱。传统的证件照制作流程需要人工用PS等工具逐个修复,耗时耗力。
组合方案的核心价值:
| 维度 | 传统PS手动处理 | 双API组合自动化 |
|---|---|---|
| 单张耗时 | 10-20分钟 | 0.5-2秒 |
| 技能要求 | 熟练PS操作 | 零门槛,调用API即可 |
| 批量处理 | 几乎不可能 | 轻松支持批量 |
| 成本 | 人工成本高 | API调用费(低至几毛/张) |
| 一致性 | 依赖个人水平 | 输出稳定一致 |
两大API各司其职:
-
图片变清晰API(AI超分辨率):将模糊、低分辨率的生活照通过深度学习模型重建为高清图片。对失焦、低像素、光线差的照片尤其有效。
-
智能抠图API:精准识别人像轮廓,自动移除复杂背景,输出透明PNG。对发丝等复杂边缘也能做到像素级分割。
二、完整工作流设计
整个自动化流程分为5步:
text
用户上传模糊生活照
       ↓
步骤1:图片预处理(格式校验、尺寸检查)
       ↓
步骤2:调用图片变清晰API → 输出高清图片
       ↓
步骤3:调用智能抠图API → 输出透明背景人像
       ↓
步骤4:背景合成(替换为证件照标准底色)
       ↓
步骤5:尺寸裁剪(按证件照规格裁剪)
       ↓
输出标准证件照
三、准备工作
-
注册API账号,获取API Key(注册即送免费测试积分)
-
准备一张模糊的生活照(手机自拍即可)
-
安装Python环境(Python 3.7+)及依赖库
使用下来,感觉石榴智能API市场不错
📌 免费在线体验(图片变清晰) :支持免费在线体验
📌 免费在线体验(智能抠图) :支持免费在线体验
📌 API文档:API文档清晰,提供多种接入语言示例(如python、js、C#、java、php等),以及自动化脚本语言(如天诺、懒人精灵、按键精灵、易语言、EasyClick、触动精灵等)
📌 注册送免费测试积分
四、完整Python实现
4.1 安装依赖bash
pip install requests pillow4.2 完整工作流代码
# 抠图
# ==============================================================================
# 免费在线体验:https://www.shiliuai.com/koutu/
# API文档完整开发文档和代码示例:https://www.shiliuai.com/api/koutu
# 支持免费在线体验
# API文档清晰,提供多种接入语言示例(如python、js、C#、java、php等),以及自动化脚本语言(如天诺、懒人精灵、按键精灵、易语言、EasyClick、触动精灵等)
#
# ----- 配置信息 -----
# 从石榴智能API市场获取API_KEY:https://www.shiliuai.com
# ==============================================================================

# 图片变高清
# ==============================================================================
# 免费在线体验:https://www.shiliuai.com/super_resolution/
# API文档完整开发文档和代码示例:https://www.shiliuai.com/api/tupianbiangaoqing
# 支持免费在线体验
# API文档清晰,提供多种接入语言示例(如python、js、C#、java、php等),以及自动化脚本语言(如天诺、懒人精灵、按键精灵、易语言、EasyClick、触动精灵等)
#
# ----- 配置信息 -----
# 从石榴智能API市场获取API_KEY:https://www.shiliuai.com
# ==============================================================================

import requests
import base64
import os
from PIL import Image
from io import BytesIO
import time

# ========== 配置区 ==========
ENHANCE_API_URL = "https://api.shiliuai.com/api/super_resolution/v1"   # 图片变清晰API地址
MATTING_API_URL = "https://api.shiliuai.com/api/matting/v1"   # 智能抠图API地址
API_KEY = "YOUR_API_KEY"

# 证件照配置
PHOTO_SPECS = {
    "一寸": {"width": 295, "height": 413},   # 像素
    "二寸": {"width": 413, "height": 626},
    "小一寸": {"width": 260, "height": 378},
    "大一寸": {"width": 390, "height": 567}
}
BG_COLORS = {
    "白底": "#FFFFFF",
    "蓝底": "#4A90D9",
    "红底": "#D94A4A"
}
# ============================

def enhance_image(image_path):
    """
    步骤2:调用图片变清晰API,将模糊图片高清化
    """
    with open(image_path, "rb") as f:
        response = requests.post(
            ENHANCE_API_URL,
            headers={"X-API-Key": API_KEY},
            files={"image": f},
            timeout=60
        )

    if response.status_code == 200:
        # 保存高清化后的图片
        enhanced_path = image_path.replace(".", "_enhanced.")
        with open(enhanced_path, "wb") as out:
            out.write(response.content)
        print(f"✅ 图片变清晰完成: {enhanced_path}")
        return enhanced_path
    else:
        raise Exception(f"图片变清晰失败: {response.status_code}")

def matting_image(image_path):
    """
    步骤3:调用智能抠图API,移除背景输出透明PNG
    """
    with open(image_path, "rb") as f:
        response = requests.post(
            MATTING_API_URL,
            headers={"X-API-Key": API_KEY},
            files={"image": f},
            timeout=60
        )

    if response.status_code == 200:
        matting_path = image_path.replace("_enhanced.", "_matting.")
        with open(matting_path, "wb") as out:
            out.write(response.content)
        print(f"✅ 智能抠图完成: {matting_path}")
        return matting_path
    else:
        raise Exception(f"智能抠图失败: {response.status_code}")

def add_background(matting_path, bg_color="#4A90D9", spec="一寸"):
    """
    步骤4-5:合成背景 + 尺寸裁剪
    """
    # 打开透明抠图结果
    img = Image.open(matting_path).convert("RGBA")

    # 创建背景图
    width, height = PHOTO_SPECS[spec]
    bg = Image.new("RGBA", (width, height), bg_color)

    # 计算人像在背景中的位置(居中,适当留白)
    img_width, img_height = img.size
    ratio = min(width * 0.7 / img_width, height * 0.8 / img_height)
    new_size = (int(img_width * ratio), int(img_height * ratio))
    img_resized = img.resize(new_size, Image.Resampling.LANCZOS)

    x = (width - new_size[0]) // 2
    y = (height - new_size[1]) // 2

    # 合成
    bg.paste(img_resized, (x, y), img_resized)

    # 输出
    output_path = matting_path.replace("_matting.", f"_{spec}_{bg_color.replace('#', '')}.")
    bg.convert("RGB").save(output_path, "JPEG", quality=95)
    print(f"✅ 证件照生成完成: {output_path}")
    return output_path

def generate_id_photo(input_path, bg_color="#4A90D9", spec="一寸"):
    """
    完整工作流:模糊生活照 → 高清证件照
    """
    print(f"📸 开始处理: {input_path}")
    start_time = time.time()

    try:
        # 步骤1:图片预处理(检查文件是否存在)
        if not os.path.exists(input_path):
            raise FileNotFoundError(f"图片不存在: {input_path}")

        # 步骤2:图片变清晰
        enhanced_path = enhance_image(input_path)

        # 步骤3:智能抠图
        matting_path = matting_image(enhanced_path)

        # 步骤4-5:合成背景 + 裁剪尺寸
        output_path = add_background(matting_path, bg_color, spec)

        elapsed = time.time() - start_time
        print(f"⏱️ 总耗时: {elapsed:.2f} 秒")
        return output_path

    except Exception as e:
        print(f"❌ 处理失败: {e}")
        return None

# ========== 调用示例 ==========
if __name__ == "__main__":
    # 单张处理
    result = generate_id_photo(
        input_path="selfie.jpg",
        bg_color="#4A90D9",   # 蓝底
        spec="一寸"           # 一寸照
4.3 批量处理版本
from concurrent.futures import ThreadPoolExecutor, as_completed
from tqdm import tqdm

def batch_generate(input_dir, output_dir, bg_color="#4A90D9", spec="一寸", max_workers=3):
    """
    批量生成证件照
    """
    os.makedirs(output_dir, exist_ok=True)

    # 收集图片
    images = [f for f in os.listdir(input_dir)
              if f.lower().endswith(('.jpg', '.jpeg', '.png'))]

    if not images:
        print("⚠️ 未找到图片")
        return

    print(f"📁 找到 {len(images)} 张图片,开始批量生成...")

    results = []
    with ThreadPoolExecutor(max_workers=max_workers) as executor:
        futures = {}
        for img in images:
            input_path = os.path.join(input_dir, img)
            futures[executor.submit(generate_id_photo, input_path, bg_color, spec)] = img

        for future in tqdm(as_completed(futures), total=len(futures), desc="生成进度"):
            result = future.result()
            results.append(result)

    success_count = sum(1 for r in results if r is not None)
    print(f"\n✅ 完成!成功: {success_count}/{len(images)}")

# 批量处理
batch_generate(
    input_dir="./photos/",
    output_dir="./id_photos/",
    bg_color="#4A90D9",
    spec="一寸",
    max_workers=3
)
五、多语言接入示例
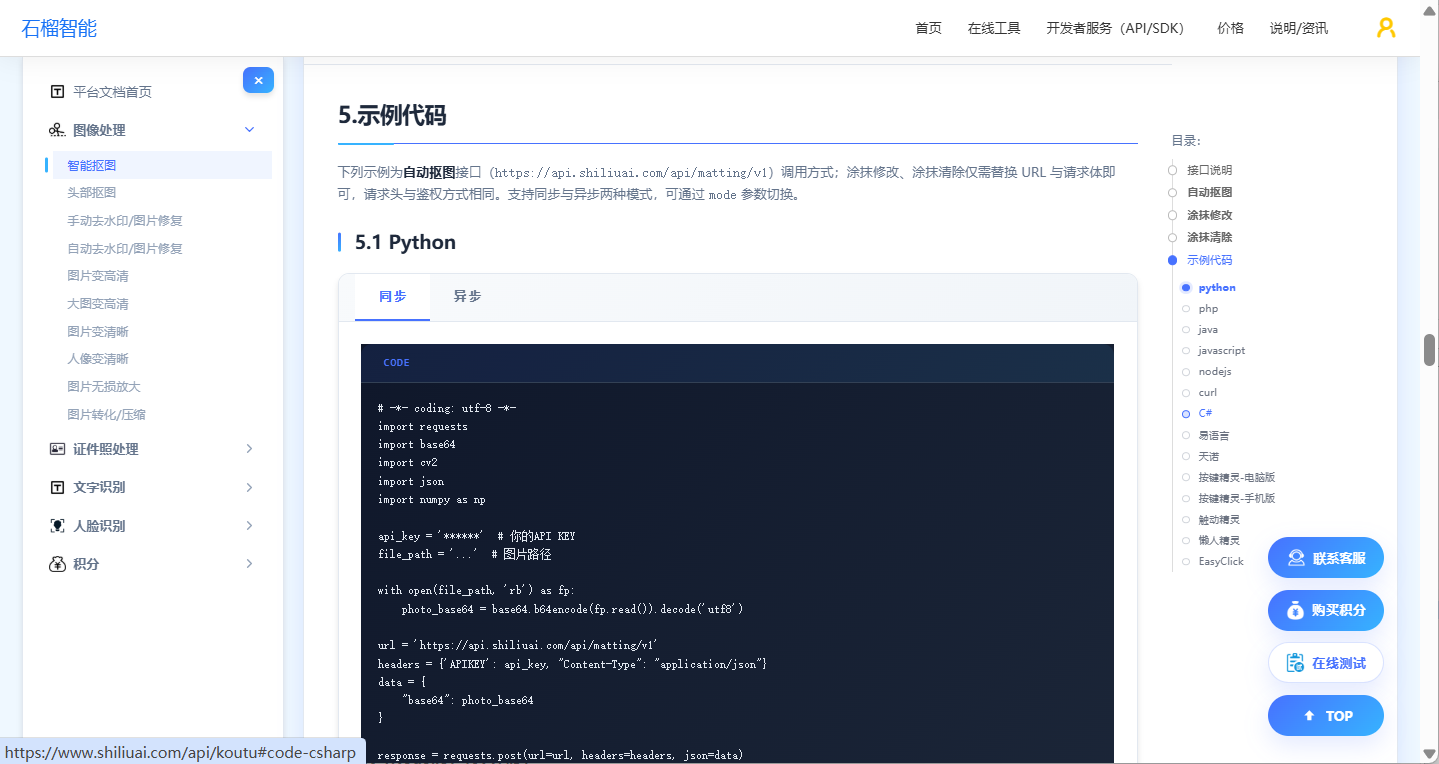
5.1 Java接入代码
// ==============================================================================
// 免费在线体验:https://www.shiliuai.com/koutu/
// API文档完整开发文档和代码示例:https://www.shiliuai.com/api/koutu
// 支持免费在线体验
// API文档清晰,提供多种接入语言示例(如python、js、C#、java、php等),以及自动化脚本语言(如天诺、懒人精灵、按键精灵、易语言、EasyClick、触动精灵等)
//
// ----- 配置信息 -----
// 从石榴智能API市场获取API_KEY:https://www.shiliuai.com
// ==============================================================================

import java.io.*;
import java.net.HttpURLConnection;
import java.net.URL;
import java.nio.file.Files;
import java.util.Base64;
import org.json.JSONObject;

public class MattingApiExample {
    public static void main(String[] args) {
        String apiKey = "******"; // 你的 API KEY
        String filePath = "..."; // 图片路径
        String apiUrl = "https://api.shiliuai.com/api/matting/v1";

        try {
            byte[] fileBytes = Files.readAllBytes(new File(filePath).toPath());
            String photoBase64 = Base64.getEncoder().encodeToString(fileBytes);

            JSONObject requestData = new JSONObject();
            requestData.put("base64", photoBase64);

            JSONObject response = sendPost(apiUrl, apiKey, requestData);
            if (response.getInt("code") == 0) {
                byte[] resultBytes = Base64.getDecoder().decode(response.getString("result_base64"));
                Files.write(new File("result.png").toPath(), resultBytes);
                System.out.println("抠图成功,已保存 result.png");
            } else {
                System.out.println("请求失败: " + response.optString("msg_cn", response.optString("msg")));
            }
        } catch (Exception e) {
            e.printStackTrace();
        }
    }

    private static JSONObject sendPost(String apiUrl, String apiKey, JSONObject body) throws Exception {
        HttpURLConnection conn = (HttpURLConnection) new URL(apiUrl).openConnection();
        conn.setRequestMethod("POST");
        conn.setRequestProperty("APIKEY", apiKey);
        conn.setRequestProperty("Content-Type", "application/json");
        conn.setDoOutput(true);
        try (OutputStream os = conn.getOutputStream()) {
            os.write(body.toString().getBytes("utf-8"));
        }
        StringBuilder sb = new StringBuilder();
        try (BufferedReader br = new BufferedReader(new InputStreamReader(conn.getInputStream(), "utf-8"))) {
            String line;
            while ((line = br.readLine()) != null) sb.append(line.trim());
        }
        return new JSONObject(sb.toString());
    }
}
5.2 PHP接入代码
// ==============================================================================
// 免费在线体验:https://www.shiliuai.com/koutu/
// API文档完整开发文档和代码示例:https://www.shiliuai.com/api/koutu
// 支持免费在线体验
// API文档清晰,提供多种接入语言示例(如python、js、C#、java、php等),以及自动化脚本语言(如天诺、懒人精灵、按键精灵、易语言、EasyClick、触动精灵等)
//
// ----- 配置信息 -----
// 从石榴智能API市场获取API_KEY:https://www.shiliuai.com
// ==============================================================================

<?php
$url = "https://api.shiliuai.com/api/matting/v1";
$method = "POST";
$apikey = "******";
$header = array();
array_push($header, "APIKEY:" . $apikey);
array_push($header, "Content-Type:application/json");

$file_path = "...";
$handle = fopen($file_path, "r");
$photo = fread($handle, filesize($file_path));
fclose($handle);
$photo_base64 = base64_encode($photo);

$data = array(
  "base64"=> $photo_base64
);
$post_data = json_encode($data);

$curl = curl_init();
curl_setopt($curl, CURLOPT_CUSTOMREQUEST, $method);
curl_setopt($curl, CURLOPT_URL, $url);
curl_setopt($curl, CURLOPT_HTTPHEADER, $header);
curl_setopt($curl, CURLOPT_POSTFIELDS, $post_data);
curl_setopt($curl, CURLOPT_RETURNTRANSFER, true);
curl_setopt($curl, CURLOPT_SSL_VERIFYPEER, false);
curl_setopt($curl, CURLOPT_SSL_VERIFYHOST, false);

$response = curl_exec($curl);
var_dump($response);
5.3 JavaScript(Node.js)接入代码
// ==============================================================================
// 免费在线体验:https://www.shiliuai.com/koutu/
// API文档完整开发文档和代码示例:https://www.shiliuai.com/api/koutu
// 支持免费在线体验
// API文档清晰,提供多种接入语言示例(如python、js、C#、java、php等),以及自动化脚本语言(如天诺、懒人精灵、按键精灵、易语言、EasyClick、触动精灵等)
//
// ----- 配置信息 -----
// 从石榴智能API市场获取API_KEY:https://www.shiliuai.com
// ==============================================================================

const fs = require('fs');

const apiKey = '******';
const filePath = '...';
const apiUrl = 'https://api.shiliuai.com/api/matting/v1';

async function main() {
  const photoBase64 = fs.readFileSync(filePath).toString('base64');

  const res = await fetch(apiUrl, {
    method: 'POST',
    headers: {
      APIKEY: apiKey,
      'Content-Type': 'application/json'
    },
    body: JSON.stringify({ base64: photoBase64 })
  });

  const data = await res.json();
  if (data.code === 0) {
    fs.writeFileSync('result.png', Buffer.from(data.result_base64, 'base64'));
    console.log('抠图成功,已保存 result.png');
  } else {
    console.error('请求失败:', data.msg_cn || data.msg);
  }
}

main().catch(console.error);
六、证件照规格参考
| 规格 | 像素尺寸 | 常见用途 |
|---|---|---|
| 一寸 | 295×413 | 国内身份证、护照、驾照 |
| 小一寸 | 260×378 | 部分考试报名 |
| 大一寸 | 390×567 | 部分签证申请 |
| 二寸 | 413×626 | 毕业证、简历 |
| 小二寸 | 413×531 | 部分国家签证 |
背景色标准:
-
白底(#FFFFFF):护照、身份证、驾驶证
-
蓝底(#4A90D9):毕业证、工作证、简历
-
红底(#D94A4A):部分证件照、结婚照
七、常见问题与解决方案
Q1:原图太模糊,变清晰后效果如何?
AI超分辨率技术通过深度学习模型补充图像细节,对失焦、低像素照片效果显著。实测对比传统插值算法,细节保留度提升60%以上。
Q2:抠图能处理发丝等复杂边缘吗?
可以。智能抠图API基于深度学习人像分割模型(如U²-Net),对发丝细节能做到像素级精准分割。
Q3:支持批量处理吗?
支持。上述Python脚本已包含批量处理功能,支持多线程并发,可一次性处理整个文件夹的图片。
Q4:组合调用两个API的成本高吗?
不高。以常见API定价计算,单张证件照生成成本不到1元,远低于照相馆拍摄费用(通常20-50元)。
Q5:可以自定义输出尺寸和背景色吗?
可以。代码中的PHOTO_SPECS和BG_COLORS字典支持自由添加自定义配置。
八、总结
通过组合调用图片变清晰API和智能抠图API,我们搭建了一条从模糊生活照到高清证件照的全自动生成流水线。整个过程只需几分钟,零PS技能要求,单张成本低至几毛钱,完美适配个人开发者、SaaS创业者和企业IT团队的各类场景。
免费在线体验:https://www.shiliuai.com/koutu/
-
🔗 免费在线体验(图片变清晰) :支持免费在线体验
-
🔗 免费在线体验(智能抠图) :支持免费在线体验
-
📖 完整API文档:API文档清晰,提供多种接入语言示例(如python、js、C#、java、php等),以及自动化脚本语言(如天诺、懒人精灵、按键精灵、易语言、EasyClick、触动精灵等)
-
🎁 注册送免费测试积分
相关阅读:

这里是“一人公司”的成长家园。我们提供从产品曝光、技术变现到法律财税的全栈内容,并连接云服务、办公空间等稀缺资源,助你专注创造,无忧运营。
更多推荐

 13
13 0
0- 0


 已为社区贡献10条内容

所有评论(0)