【实战项目】从零搭建 AI Agent 客服系统:React前端 + Python后端 + 多工具调用
·
作者:尘一不染 | 2026-04-17
项目源码:https://github.com/AiW520/Ai-Agent
技术栈:Python + FastAPI + LangChain + React + TypeScript + Vercel AI SDK
适合人群:想入门 AI Agent 开发的前端/全栈工程师
一、项目介绍:为什么我要做这个?
1.1 背景与痛点
作为AI的一个学习者,我深刻理解一个道理:最好的学习是实践,最好的进步是去解决复杂问题、有技术深度、能把 AI 能力落地到实际业务中。
而这,就是我的一个初尝试。
传统客服系统的痛点:
- ❌ 只能回答固定问题,扩展性差
- ❌ 无法理解上下文,多轮对话体验差
- ❌ 没有真正"智能",用户换个说法就听不懂
1.2 AI Agent 能解决什么?
plaintext
普通对话Bot:你问→它答→结束(被动响应)
AI Agent:你给目标→它拆解任务→调用工具→自主执行→返回结果(主动规划)
这个项目展示的核心能力:
- ✅ 意图识别:理解用户真实需求
- ✅ 工具调用:查天气、搜文档、读数据库
- ✅ 多轮对话记忆:记住上下文,像真人一样聊天
- ✅ 流式响应:打字机效果,体验拉满
1.3 技术架构图
plaintext
┌─────────────────────────────────────────────────────────────┐
│                        用户界面 (React)                      │
│                    流式响应 + 打字机效果                      │
└─────────────────────────┬───────────────────────────────────┘
                          │ WebSocket / SSE
                          ▼
┌─────────────────────────────────────────────────────────────┐
│                     后端服务 (FastAPI)                        │
│  ┌──────────────┐  ┌──────────────┐  ┌──────────────┐       │
│  │  意图识别    │→ │  任务规划    │→ │  工具调用    │       │
│  └──────────────┘  └──────────────┘  └──────────────┘       │
│                          │                                   │
│                          ▼                                   │
│  ┌──────────────┐  ┌──────────────┐  ┌──────────────┐       │
│  │   记忆模块   │  │   LLM 调用   │  │   结果生成   │       │
│  └──────────────┘  └──────────────┘  └──────────────┘       │
└─────────────────────────┬───────────────────────────────────┘
                          │
          ┌───────────────┼───────────────┐
          ▼               ▼               ▼
    ┌──────────┐    ┌──────────┐    ┌──────────┐
    │ 天气API  │    │ 知识库   │    │ 业务DB   │
    └──────────┘    └──────────┘    └──────────┘
二、环境搭建(5分钟搞定)
2.1 后端环境
bash
# 创建项目目录
mkdir ai-agent-customer-service
cd ai-agent-customer-service

# 创建虚拟环境(Python 3.10+)
python -m venv venv
# Windows
venv\Scripts\activate
# Mac/Linux
source venv/bin/activate

# 安装核心依赖
pip install fastapi uvicorn langchain langchain-community
pip install python-dotenv requests sse-starlette
2.2 前端环境
bash
# 使用 Next.js 15 创建项目
npx create-next-app@latest frontend
# 配置选择:
# ✔ TypeScript - Yes
# ✔ ESLint - Yes
# ✔ Tailwind CSS - Yes
# ✔ App Router - Yes

cd frontend

# 安装 AI 开发核心依赖
npm install ai @ai-sdk/openai
npm install lucide-react   # 图标库
npm install clsx tailwind-merge  # 工具函数
三、后端核心代码(Python Agent)
3.1 项目结构
backend/
├── main.py              # 入口文件
├── .env                 # 环境变量
├── core/
│   ├── llm.py           # LLM 调用封装
│   ├── agent.py         # Agent 核心逻辑
│   └── memory.py        # 对话记忆
├── tools/
│   ├── weather.py       # 天气查询工具
│   ├── knowledge.py     # 知识库查询
│   └── database.py      # 数据库操作
└── utils/
    └── stream.py        # 流式响应工具
3.2 LLM 封装(src/core/llm.py)
python
"""
LLM 调用封装 - 支持 DeepSeek、OpenAI 等多模型
核心要点:
1. 统一接口,方便切换模型
2. 支持流式输出
3. 完善的错误处理
"""
import os
from typing import AsyncIterator
from openai import AsyncOpenAI
from dotenv import load_dotenv

load_dotenv()

class LLMClient:
    """大模型客户端封装"""

    def __init__(self):
        # 支持 DeepSeek(性价比高)或 OpenAI
        self.client = AsyncOpenAI(
            api_key=os.getenv("DEEPSEEK_API_KEY"),
            base_url=os.getenv("DEEPSEEK_BASE_URL", "https://api.deepseek.com/v1"),
        )
        self.model = os.getenv("MODEL_NAME", "deepseek-chat")

    async def chat(self, messages: list, stream: bool = True):
        """
        对话方法

        Args:
            messages: 对话历史,格式 [{"role": "user/assistant", "content": "..."}]
            stream: 是否流式输出

        Returns:
            流式响应迭代器 或 完整响应
        """
        try:
            response = await self.client.chat.completions.create(
                model=self.model,
                messages=messages,
                stream=stream,
                temperature=0.7,  # 控制随机性
                max_tokens=2000,
            )

            if stream:
                return self._stream_response(response)
            else:
                return response.choices[0].message.content

        except Exception as e:
            print(f"LLM 调用失败: {e}")
            return "抱歉,服务暂时不可用,请稍后重试。"

    async def _stream_response(self, response):
        """流式响应处理器"""
        async for chunk in response:
            if chunk.choices[0].delta.content:
                yield chunk.choices[0].delta.content
3.3 工具定义(src/tools/weather.py)
"""
天气查询工具 - 展示如何定义一个 Agent 工具
核心要点:
1. 工具必须有清晰的描述(LLM 根据描述决定是否调用)
2. 参数要有类型和说明
3. 返回格式要统一
"""
import requests
from typing import Dict, Any

class WeatherTool:
    """天气查询工具"""

    # 工具描述 - LLM 根据这个决定是否调用
    description = """查询指定城市的天气信息。
    当用户询问天气预报、气温、是否下雨等情况时使用。
    输入:城市名称(字符串)
    输出:天气信息(温度、湿度、天气状况)
    """

    def __init__(self):
        # 这里使用免费天气API(替换成你的真实API)
        self.api_key = "your_free_weather_api_key"
        self.base_url = "https://api.weather.example.com"

    def invoke(self, city: str) -> Dict[str, Any]:
        """
        执行天气查询

        Args:
            city: 城市名称,如"北京"、"上海"

        Returns:
            统一格式的返回结果
        """
        try:
            # 调用天气API(这里用模拟数据演示)
            # 实际项目中替换为真实API调用
            # response = requests.get(f"{self.base_url}?city={city}&key={self.api_key}")
            # data = response.json()

            # 模拟返回数据
            weather_data = {
                "北京": {"temp": "15-22℃", "weather": "多云", "humidity": "65%"},
                "上海": {"temp": "18-26℃", "weather": "晴", "humidity": "55%"},
                "深圳": {"temp": "24-30℃", "weather": "雷阵雨", "humidity": "80%"},
            }

            if city in weather_data:
                info = weather_data[city]
                return {
                    "status": "success",
                    "data": f"{city}今天天气{info['weather']},"
                           f"气温{info['temp']},"
                           f"湿度{info['humidity']}"
                }
            else:
                return {
                    "status": "success",
                    "data": f"未找到{city}的天气数据,请确认城市名称是否正确。"
                }

        except Exception as e:
            return {
                "status": "error",
                "error": f"查询天气失败: {str(e)}"
            }
3.4 知识库工具(src/tools/knowledge.py)
"""
知识库查询工具 - 展示 RAG(检索增强生成)的简单实现
核心要点:
1. 基于关键词或向量相似度检索
2. 返回最相关的内容片段
3. 可扩展为真正的向量数据库(Milvus/Pinecone)
"""

from typing import List, Dict, Any

class KnowledgeBaseTool:
    """产品知识库查询工具"""

    description = """查询产品相关的常见问题答案。
    当用户询问产品功能、使用方法、价格、售后等问题时使用。
    输入:查询问题(字符串)
    输出:相关知识片段(字符串列表)
    """

    def __init__(self):
        # 模拟知识库,实际项目中用向量数据库
        self.knowledge_base = [
            {
                "question": "产品功能",
                "answer": "我们的产品支持:智能客服、数据分析、自动报告生成、API集成等功能。"
            },
            {
                "question": "价格方案",
                "answer": "基础版免费,专业版99元/月,企业版299元/月,年付享8折优惠。"
            },
            {
                "question": "如何使用API",
                "answer": "1. 注册账号获取API Key\n2. 阅读开发文档\n3. 调用 /api/v1/chat 接口\n4. 参考SDK示例代码"
            },
            {
                "question": "售后服务",
                "answer": "提供7x24小时在线客服,邮箱 support@example.com,工作时间1小时内响应。"
            }
        ]

    def invoke(self, query: str) -> Dict[str, Any]:
        """
        知识库检索

        Args:
            query: 用户问题

        Returns:
            检索结果
        """
        # 简单关键词匹配,实际用向量检索
        query_lower = query.lower()
        results = []

        for item in self.knowledge_base:
            # 简单的关键词匹配逻辑
            keywords = ["功能", "价格", "API", "售后", "使用"]
            for keyword in keywords:
                if keyword in query or keyword in item["question"]:
                    results.append(item["answer"])
                    break

        if results:
            return {
                "status": "success",
                "data": results[:2]  # 返回最多2条最相关结果
            }
        else:
            return {
                "status": "no_result",
                "data": "抱歉,知识库中未找到相关信息,建议转人工客服。"
            }
3.5 Agent 核心逻辑(src/core/agent.py)
"""
AI Agent 核心逻辑 - 实现 ReAct 模式
ReAct = Reasoning + Acting
核心循环:思考 → 行动 → 观察 → 反思
"""

import json
from typing import List, Dict, Any, AsyncIterator
from .llm import LLMClient
from .memory import ConversationMemory

class CustomerServiceAgent:
    """客服 Agent - 整合 LLM、工具、记忆"""

    def __init__(self):
        self.llm = LLMClient()
        self.memory = ConversationMemory(max_history=10)

        # 初始化工具列表
        from ..tools.weather import WeatherTool
        from ..tools.knowledge import KnowledgeBaseTool

        self.tools = {
            "weather": WeatherTool(),
            "knowledge": KnowledgeBaseTool(),
        }

        # 系统提示词 - 设定 Agent 角色和行为
        self.system_prompt = """你是一个专业、友好的在线客服助手。

        你的职责:
        1. 热情、耐心地回答用户问题
        2. 准确理解用户需求
        3. 适时调用工具获取信息
        4. 无法解答时引导用户联系人工客服

        工具说明:
        - weather: 查询城市天气信息
        - knowledge: 查询产品相关知识

        回复规范:
        1. 简洁明了,不超过 200 字
        2. 使用友好的语气
        3. 必要时用列表或分点说明
        4. 遇到无法解答的问题,礼貌引导转人工
        """

    async def chat(self, user_input: str) -> AsyncIterator[str]:
        """
        处理用户输入,返回流式响应

        Args:
            user_input: 用户消息

        Yields:
            流式输出的文本片段
        """
        # 1. 获取对话历史
        history = self.memory.get_history()

        # 2. 构建消息列表
        messages = [
            {"role": "system", "content": self.system_prompt},
            *history,
            {"role": "user", "content": user_input}
        ]

        # 3. 判断是否需要调用工具
        should_use_tool, tool_name, tool_params = self._should_use_tool(user_input)

        if should_use_tool and tool_name in self.tools:
            # 4a. 调用工具
            tool_result = self.tools[tool_name].invoke(**tool_params)

            # 5a. 将工具结果加入上下文
            if isinstance(tool_result, dict) and tool_result.get("status") == "success":
                tool_context = f"\n\n[系统信息] {tool_result['data']}"
            else:
                tool_context = ""

            # 重新构建消息,让 LLM 基于工具结果生成回答
            messages[-1]["content"] = user_input + tool_context

        # 6. 调用 LLM 生成回复(流式)
        response_text = ""
        async for chunk in await self.llm.chat(messages, stream=True):
            response_text += chunk
            yield chunk

        # 7. 保存对话历史
        self.memory.add(user_input, response_text)

    def _should_use_tool(self, user_input: str) -> tuple:
        """
        判断是否需要调用工具

        Returns:
            (是否调用, 工具名, 工具参数)
        """
        user_lower = user_input.lower()

        # 天气相关关键词
        weather_keywords = ["天气", "气温", "温度", "下雨", "下雪", "晴"]
        if any(kw in user_lower for kw in weather_keywords):
            # 提取城市名(简化处理)
            city = self._extract_city(user_input)
            return (True, "weather", {"city": city or "北京"})

        # 知识库相关(默认使用)
        return (True, "knowledge", {"query": user_input})

    def _extract_city(self, text: str) -> str:
        """简单提取城市名"""
        cities = ["北京", "上海", "深圳", "广州", "杭州", "成都", "武汉", "西安"]
        for city in cities:
            if city in text:
                return city
        return None
3.6 对话记忆(src/core/memory.py)
"""
对话记忆模块 - 维护多轮对话上下文
核心要点:
1. 限制历史长度,避免上下文溢出
2. 支持上下文压缩
3. 可持久化到数据库
"""

from typing import List, Dict
from collections import deque

class ConversationMemory:
    """对话记忆管理器"""

    def __init__(self, max_history: int = 10):
        """
        Args:
            max_history: 最大保存的对话轮数
        """
        self.max_history = max_history
        self.history = deque(maxlen=max_history)

    def add(self, user_input: str, assistant_response: str):
        """添加一轮对话"""
        self.history.append({
            "user": user_input,
            "assistant": assistant_response
        })

    def get_history(self) -> List[Dict[str, str]]:
        """获取格式化的对话历史"""
        messages = []
        for item in self.history:
            messages.append({"role": "user", "content": item["user"]})
            messages.append({"role": "assistant", "content": item["assistant"]})
        return messages

    def clear(self):
        """清空记忆"""
        self.history.clear()

    def get_context_summary(self) -> str:
        """获取对话摘要"""
        if not self.history:
            return "暂无对话历史"

        summary = f"共 {len(self.history)} 轮对话\n"
        for i, item in enumerate(list(self.history)[-3:], 1):
            summary += f"{i}. 用户: {item['user'][:30]}...\n"
        return summary
3.7 API 入口(main.py)
"""
FastAPI 后端入口 - 提供 WebSocket 和 SSE 两种实时通信方式
"""

from fastapi import FastAPI, WebSocket, WebSocketDisconnect
from fastapi.middleware.cors import CORSMiddleware
from sse_starlette.sse import EventSourceResponse
import asyncio
import json

from core.agent import CustomerServiceAgent

app = FastAPI(title="AI 客服 Agent API")

# CORS 配置
app.add_middleware(
    CORSMiddleware,
    allow_origins=["*"],  # 生产环境限制具体域名
    allow_credentials=True,
    allow_methods=["*"],
    allow_headers=["*"],
)

# 存储在线连接(WebSocket 方式)
active_connections: list[WebSocket] = []

@app.get("/")
async def root():
    """健康检查"""
    return {"status": "ok", "message": "AI 客服 Agent 服务运行中"}

@app.get("/health")
async def health():
    """健康检查端点"""
    return {"status": "healthy"}

# ========== WebSocket 实时对话 ==========

@app.websocket("/ws/chat")
async def websocket_chat(websocket: WebSocket):
    """
    WebSocket 实时对话接口

    前端连接示例:
    const ws = new WebSocket('ws://localhost:8000/ws/chat');
    ws.onmessage = (event) => console.log(event.data);
    ws.send(JSON.stringify({message: "你好"}));
    """
    await websocket.accept()
    active_connections.append(websocket)

    # 每个连接创建独立的 Agent 实例
    agent = CustomerServiceAgent()

    try:
        while True:
            # 接收消息
            data = await websocket.receive_text()
            user_message = json.loads(data).get("message", "")

            if not user_message:
                continue

            # 处理并流式返回
            async for chunk in agent.chat(user_message):
                await websocket.send_text(json.dumps({
                    "type": "chunk",
                    "content": chunk
                }))

            # 结束标识
            await websocket.send_text(json.dumps({
                "type": "done",
                "content": ""
            }))

    except WebSocketDisconnect:
        active_connections.remove(websocket)
    except Exception as e:
        print(f"WebSocket 错误: {e}")
        await websocket.send_text(json.dumps({
            "type": "error",
            "content": str(e)
        }))

# ========== SSE 方式对话(推荐) ==========

@app.get("/stream")
async def stream_chat(message: str):
    """
    SSE 流式对话接口

    前端使用示例:
    fetch('/stream?message=你好').then(r => r.body.getReader())
    """
    agent = CustomerServiceAgent()

    async def event_generator():
        async for chunk in agent.chat(message):
            yield {
                "event": "message",
                "data": json.dumps({"content": chunk})
            }
        yield {
            "event": "done",
            "data": json.dumps({"content": ""})
        }

    return EventSourceResponse(event_generator())

if __name__ == "__main__":
    import uvicorn
    uvicorn.run(app, host="0.0.0.0", port=8000)
启动后端服务:
cd backend
uvicorn main:app --reload --port 8000
四、前端核心代码(React + TypeScript)
4.1 AI 消息气泡组件
TSX
// components/ChatBubble.tsx
"use client";

import { cn } from "@/lib/utils";
import { User, Bot } from "lucide-react";
import { useEffect, useRef } from "react";

interface ChatBubbleProps {
  role: "user" | "assistant";
  content: string;
  isStreaming?: boolean;
}

export function ChatBubble({ role, content, isStreaming }: ChatBubbleProps) {
  const isUser = role === "user";
  const bubbleRef = useRef<HTMLDivElement>(null);

  // 自动滚动到底部
  useEffect(() => {
    bubbleRef.current?.scrollIntoView({ behavior: "smooth" });
  }, [content, isStreaming]);

  return (
    <div
      ref={bubbleRef}
      className={cn(
        "flex gap-3 p-4 rounded-lg",
        isUser ? "bg-blue-500 text-white ml-12" : "bg-gray-100 mr-12"
      )}
    >
      {/* 头像 */}
      <div className="flex-shrink-0">
        {isUser ? (
          <User className="w-5 h-5" />
        ) : (
          <Bot className="w-5 h-5 text-green-600" />
        )}
      </div>

      {/* 消息内容 */}
      <div className="flex-1 min-w-0">
        <p className="whitespace-pre-wrap break-words">
          {content}
          {/* 打字机光标效果 */}
          {isStreaming && (
            <span className="inline-block w-2 h-4 bg-current animate-pulse ml-1" />
          )}
        </p>
      </div>
    </div>
  );
}
4.2 流式对话 Hook
// hooks/useChatStream.ts
"use client";

import { useState, useCallback } from "react";
import { useCompletion } from "ai/react";

interface Message {
  id: string;
  role: "user" | "assistant";
  content: string;
}

export function useChatStream() {
  const [messages, setMessages] = useState<Message[]>([]);
  const [isLoading, setIsLoading] = useState(false);

  // 使用 Vercel AI SDK 的 useCompletion hook
  const { complete, completion } = useCompletion({
    api: "/api/chat",
    onFinish: () => {
      // 保存完整回复到消息列表
      setMessages(prev => [
        ...prev,
        {
          id: Date.now().toString(),
          role: "assistant",
          content: completion
        }
      ]);
      setIsLoading(false);
    },
    onError: (error) => {
      console.error("Chat error:", error);
      setIsLoading(false);
    }
  });

  const sendMessage = useCallback(async (content: string) => {
    if (!content.trim() || isLoading) return;

    // 添加用户消息
    setMessages(prev => [
      ...prev,
      { id: Date.now().toString(), role: "user", content }
    ]);

    setIsLoading(true);

    // 发送请求(流式)
    complete(content);
  }, [complete, isLoading]);

  return {
    messages,
    sendMessage,
    isLoading,
    streamingContent: completion  // 当前流式内容
  };
}
4.3 聊天主界面
tsx
// app/page.tsx
"use client";

import { useState } from "react";
import { ChatBubble } from "@/components/ChatBubble";
import { useChatStream } from "@/hooks/useChatStream";
import { Send } from "lucide-react";

export default function ChatPage() {
  const [input, setInput] = useState("");
  const { messages, sendMessage, isLoading, streamingContent } = useChatStream();

  const handleSubmit = (e: React.FormEvent) => {
    e.preventDefault();
    if (input.trim()) {
      sendMessage(input);
      setInput("");
    }
  };

  return (
    <div className="flex flex-col h-screen max-w-3xl mx-auto p-4">
      {/* 标题 */}
      <header className="text-center py-4 border-b">
        <h1 className="text-2xl font-bold text-gray-800">
          🤖 AI 智能客服
        </h1>
        <p className="text-sm text-gray-500 mt-1">
          基于 DeepSeek + LangChain 的智能对话系统
        </p>
      </header>

      {/* 消息列表 */}
      <div className="flex-1 overflow-y-auto py-4 space-y-4">
        {messages.map((msg) => (
          <ChatBubble
            key={msg.id}
            role={msg.role}
            content={msg.content}
          />
        ))}

        {/* 流式输出中的消息 */}
        {isLoading && streamingContent && (
          <ChatBubble
            role="assistant"
            content={streamingContent}
            isStreaming
          />
        )}
      </div>

      {/* 输入框 */}
      <form onSubmit={handleSubmit} className="flex gap-2 p-4 border-t">
        <input
          type="text"
          value={input}
          onChange={(e) => setInput(e.target.value)}
          placeholder="输入您的问题..."
          disabled={isLoading}
          className="flex-1 px-4 py-3 rounded-lg border focus:outline-none
                     focus:ring-2 focus:ring-blue-500 disabled:bg-gray-100"
        />
        <button
          type="submit"
          disabled={isLoading || !input.trim()}
          className="px-6 py-3 bg-blue-500 text-white rounded-lg font-medium
                     hover:bg-blue-600 disabled:bg-gray-300 disabled:cursor-not-allowed
                     flex items-center gap-2 transition-colors"
        >
          <Send className="w-4 h-4" />
          发送
        </button>
      </form>
    </div>
  );
}
4.4 API 路由(流式代理)
tsx
// app/api/chat/route.ts
import { openai } from '@ai-sdk/openai';
import { streamText } from 'ai';

export const runtime = 'edge';

export async function POST(req: Request) {
  const { message } = await req.json();

  const result = streamText({
    model: openai('deepseek-chat'),
    messages: [
      {
        role: 'system',
        content: '你是一个专业友好的客服助手...'
      },
      {
        role: 'user',
        content: message
      }
    ],
    temperature: 0.7,
    maxTokens: 2000,
  });

  return result.toDataStreamResponse();
}
启动前端服务:
bash
cd frontend
npm run dev
五、运行效果
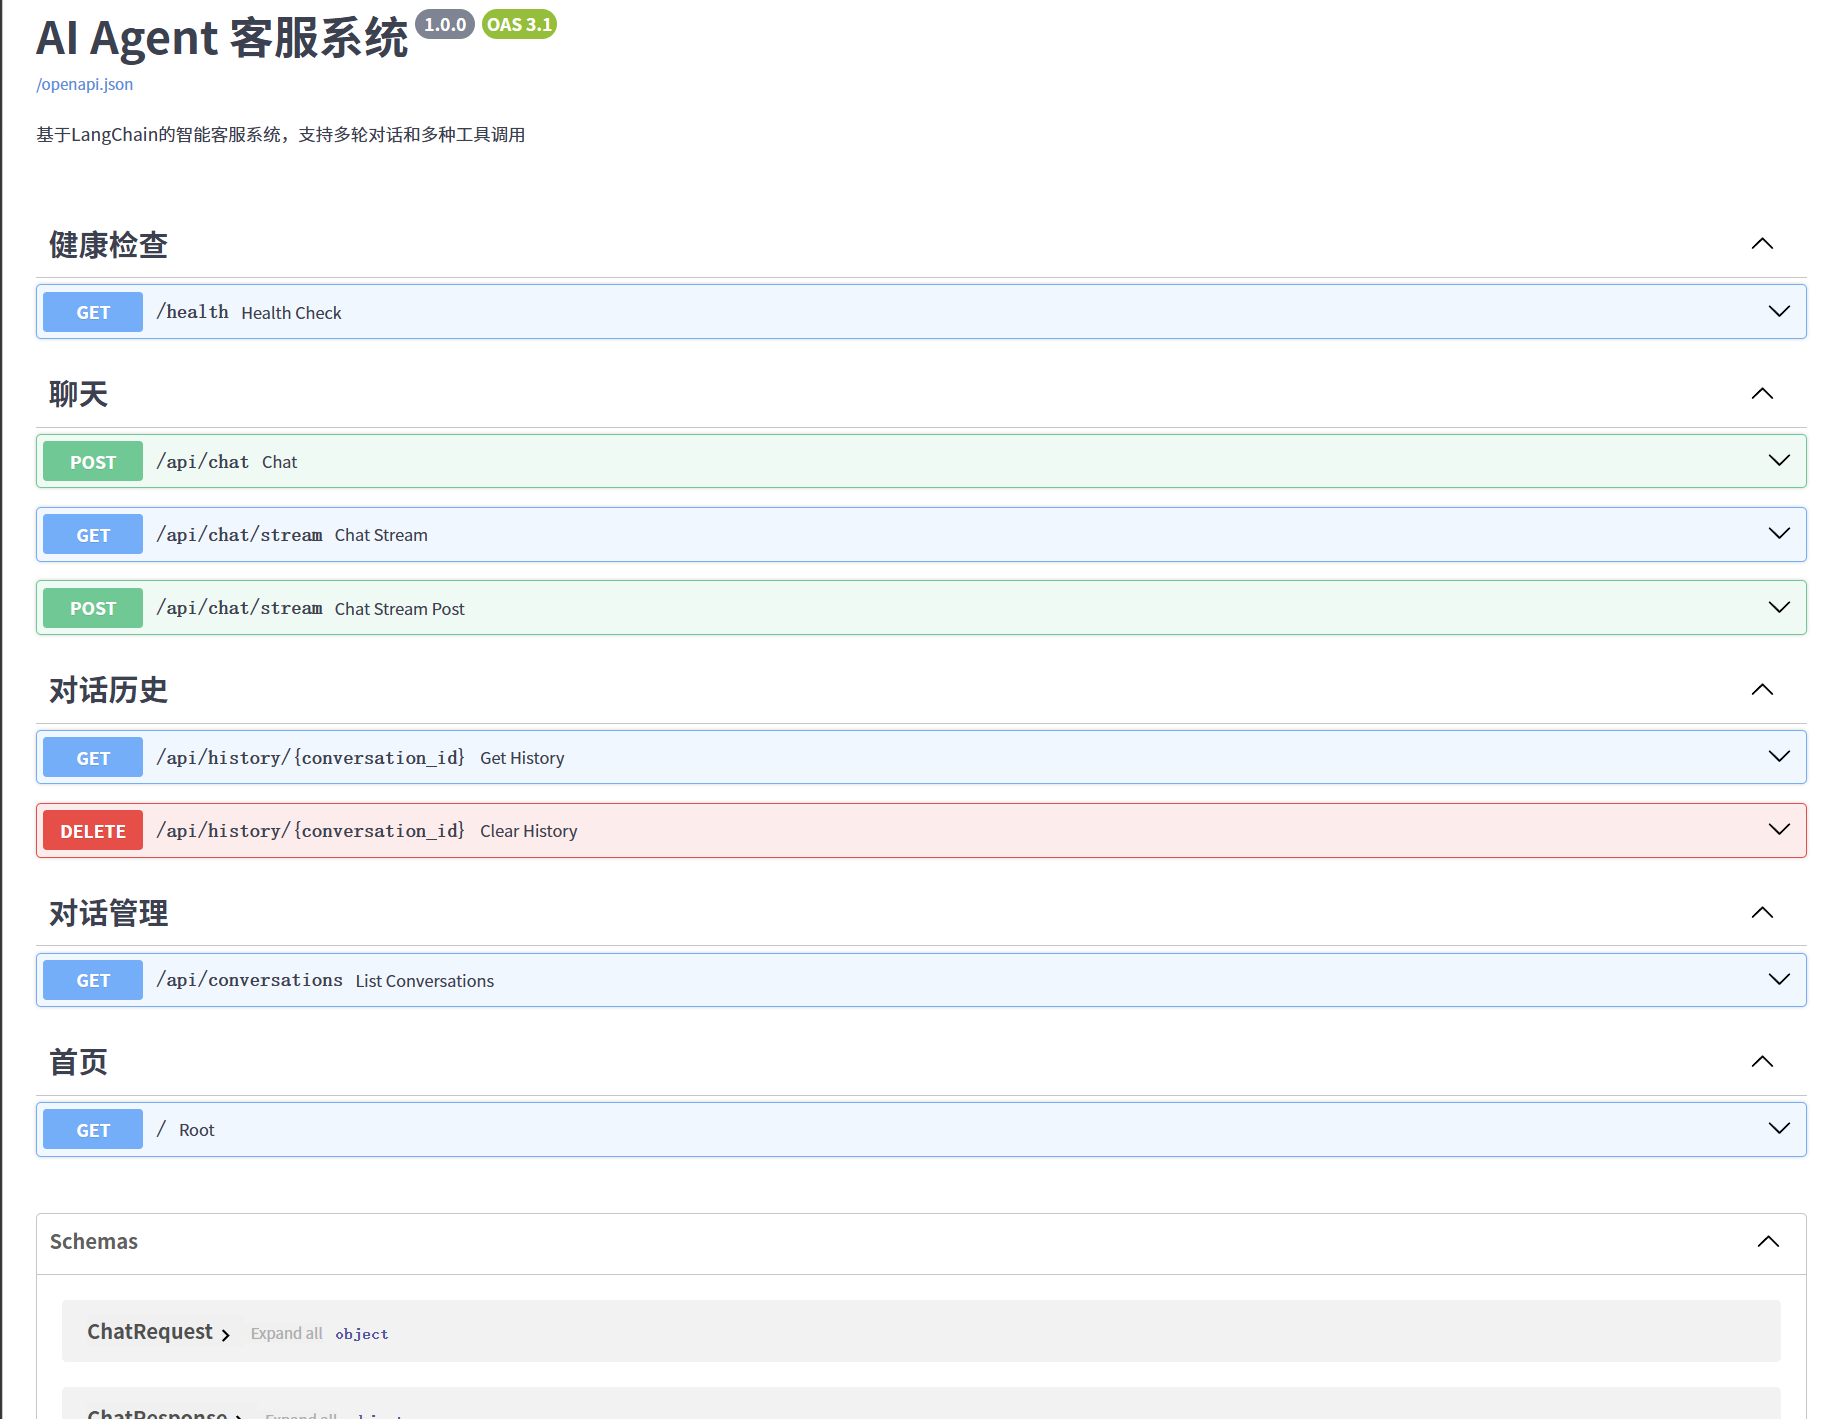
5.1 界面展示
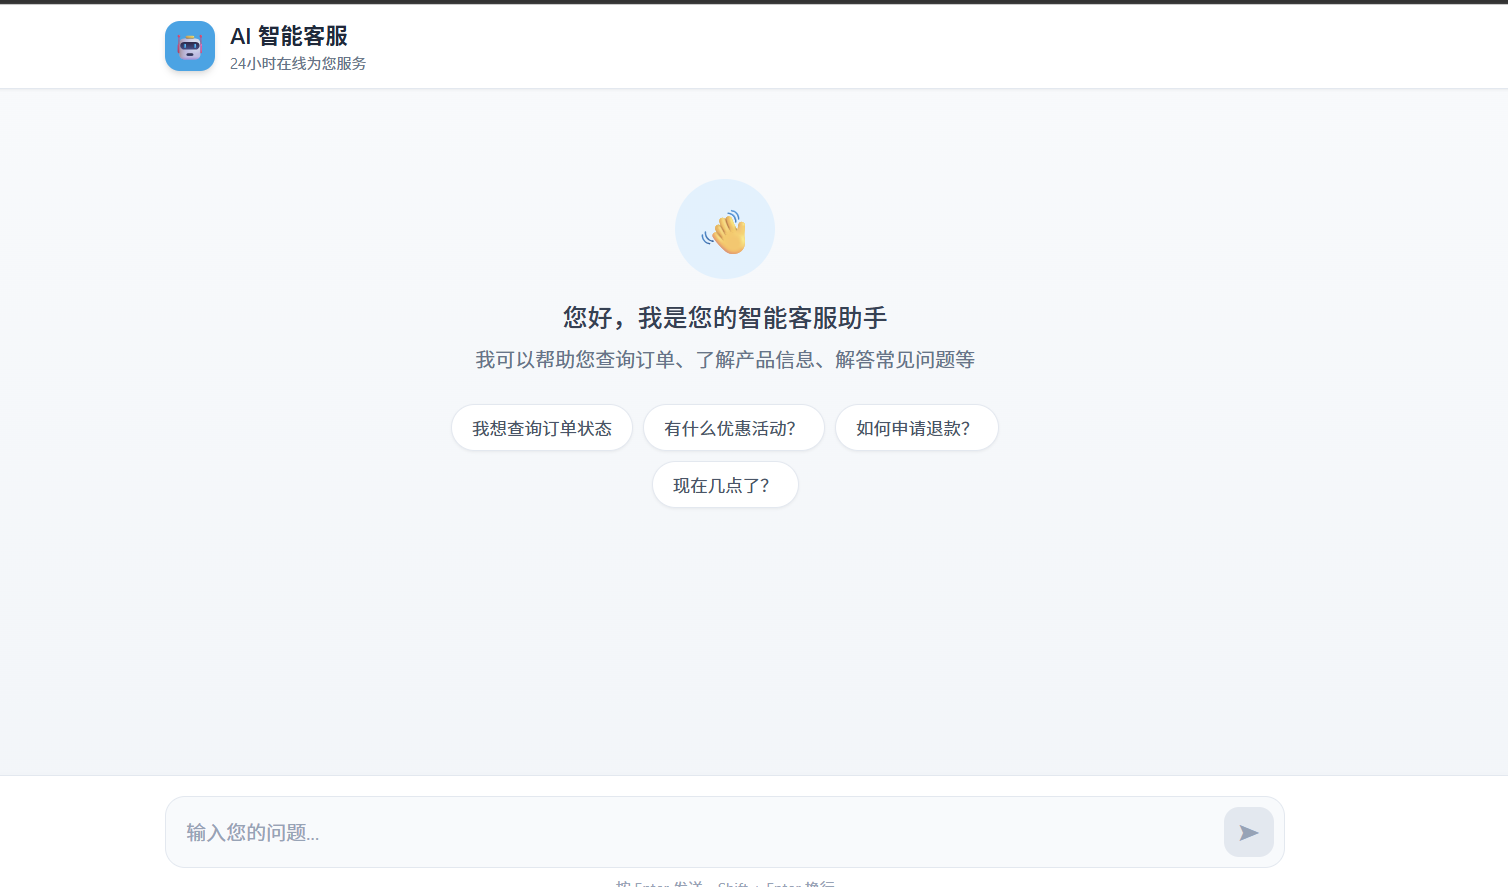
5.2 交互示例
| 用户输入 | Agent 行为 | 返回内容 |
|---|---|---|
| "产品怎么收费" | 查知识库 | 价格方案说明 |
| "北京天气怎么样" | 调天气API | 北京实时天气 |
| "我要退款" | 查知识库+引导 | 退款流程+转人工 |
| "你好" | 直接回复 | 友好问候 |
六、深度思考
6.1 坑点 1:Token 溢出问题
问题:多轮对话后上下文越来越长,容易超出模型限制。
解决方案:
python
# 1. 限制历史长度
MAX_HISTORY = 10  # 只保留最近10轮

# 2. 上下文压缩
def compress_context(messages):
    """对长对话进行摘要压缩"""
    if len(messages) > 5:
        # 用 LLM 生成摘要,替换中间消息
        pass
6.2 坑点 2:工具调用乱串
问题:Agent 可能多次调用同一个工具,或不该调时乱调。
解决方案:
python
# 强化 Prompt + 限制调用次数
TOOL_CALL_LIMIT = 3  # 单次对话最多调用3次工具

# 或者用 ReAct 框架内置的校验
6.3 坑点 3:流式响应断开
问题:网络波动导致流式输出中断。
解决方案:
tsx
// 前端添加重连逻辑
const connect = async () => {
  try {
    await fetch('/api/chat');
  } catch (error) {
    // 自动重连,最多重试3次
    if (retryCount < 3) {
      setTimeout(() => connect(), 1000);
    }
  }
};
6.4 优化建议:生产环境必做
| 优化项 | 说明 | 优先级 |
|---|---|---|
| 敏感词过滤 | 防止用户输入违规内容 | |
| Rate Limiting | 防止恶意刷接口 | |
| 关键词限流 | 单用户每分钟请求上限 | |
| 日志审计 | 记录所有对话用于分析 | |
| 指标监控 | 请求量、响应时间、成功率 |
七、相关的资源推荐
7.1 推荐资源
| 资源 | 类型 | 链接 |
|---|---|---|
| LangChain 官方文档 | 文档 | python.langchain.com |
| Vercel AI SDK | 工具库 | sdk.vercel.ai |
| DeepSeek API | 模型服务 | platform.deepseek.com |
| 全栈 Agent 实战 | 视频课程 | B站搜索 "AI Agent 实战" |
九、总结
这个项目展示了:
- ✅ 全栈能力:Python 后端 + React 前端
- ✅ AI 落地能力:不只是调 API,真正理解 Agent 架构
- ✅ 工程化思维:流式响应、错误处理、生产优化
- ✅ 可展示性:有完整 UI、真实交互、代码可运行

这里是“一人公司”的成长家园。我们提供从产品曝光、技术变现到法律财税的全栈内容,并连接云服务、办公空间等稀缺资源,助你专注创造,无忧运营。
更多推荐

 17
17 0
0- 0


 已为社区贡献2条内容

所有评论(0)