Swift独立开发者--Link App的开发笔记(二)--引入Supabase
上面的代码实现了很基础的注册、登录和退出的功能,Supabase默认开启了邮箱注册,我采用的目前也是这种方式,更多的相关支持方式可以到项目的Auth模块查看一下。可以看到下面有一个显示Swift的地方,点开Docs可以查看官方提供的一些API文档和一些具体的业务代码,在此基础上可以进行修改,并运用到自己的App中。这个不对文档里的代码进行更多的赘述了,回到我的App中看一下具体怎么使用。来添加Su
Supabase 是一个开源的后端即服务(BaaS)平台,旨在为开发者提供类似 Firebase 的体验,基于PostgreSQL 数据库,可以帮助开发者快速构建应用。
结合上一文章中的例子,首先要用到的就是其中的Auth模块,用来开发用户的登录注册等功能。
首先创建项目(Project),然后进入到项目的主页: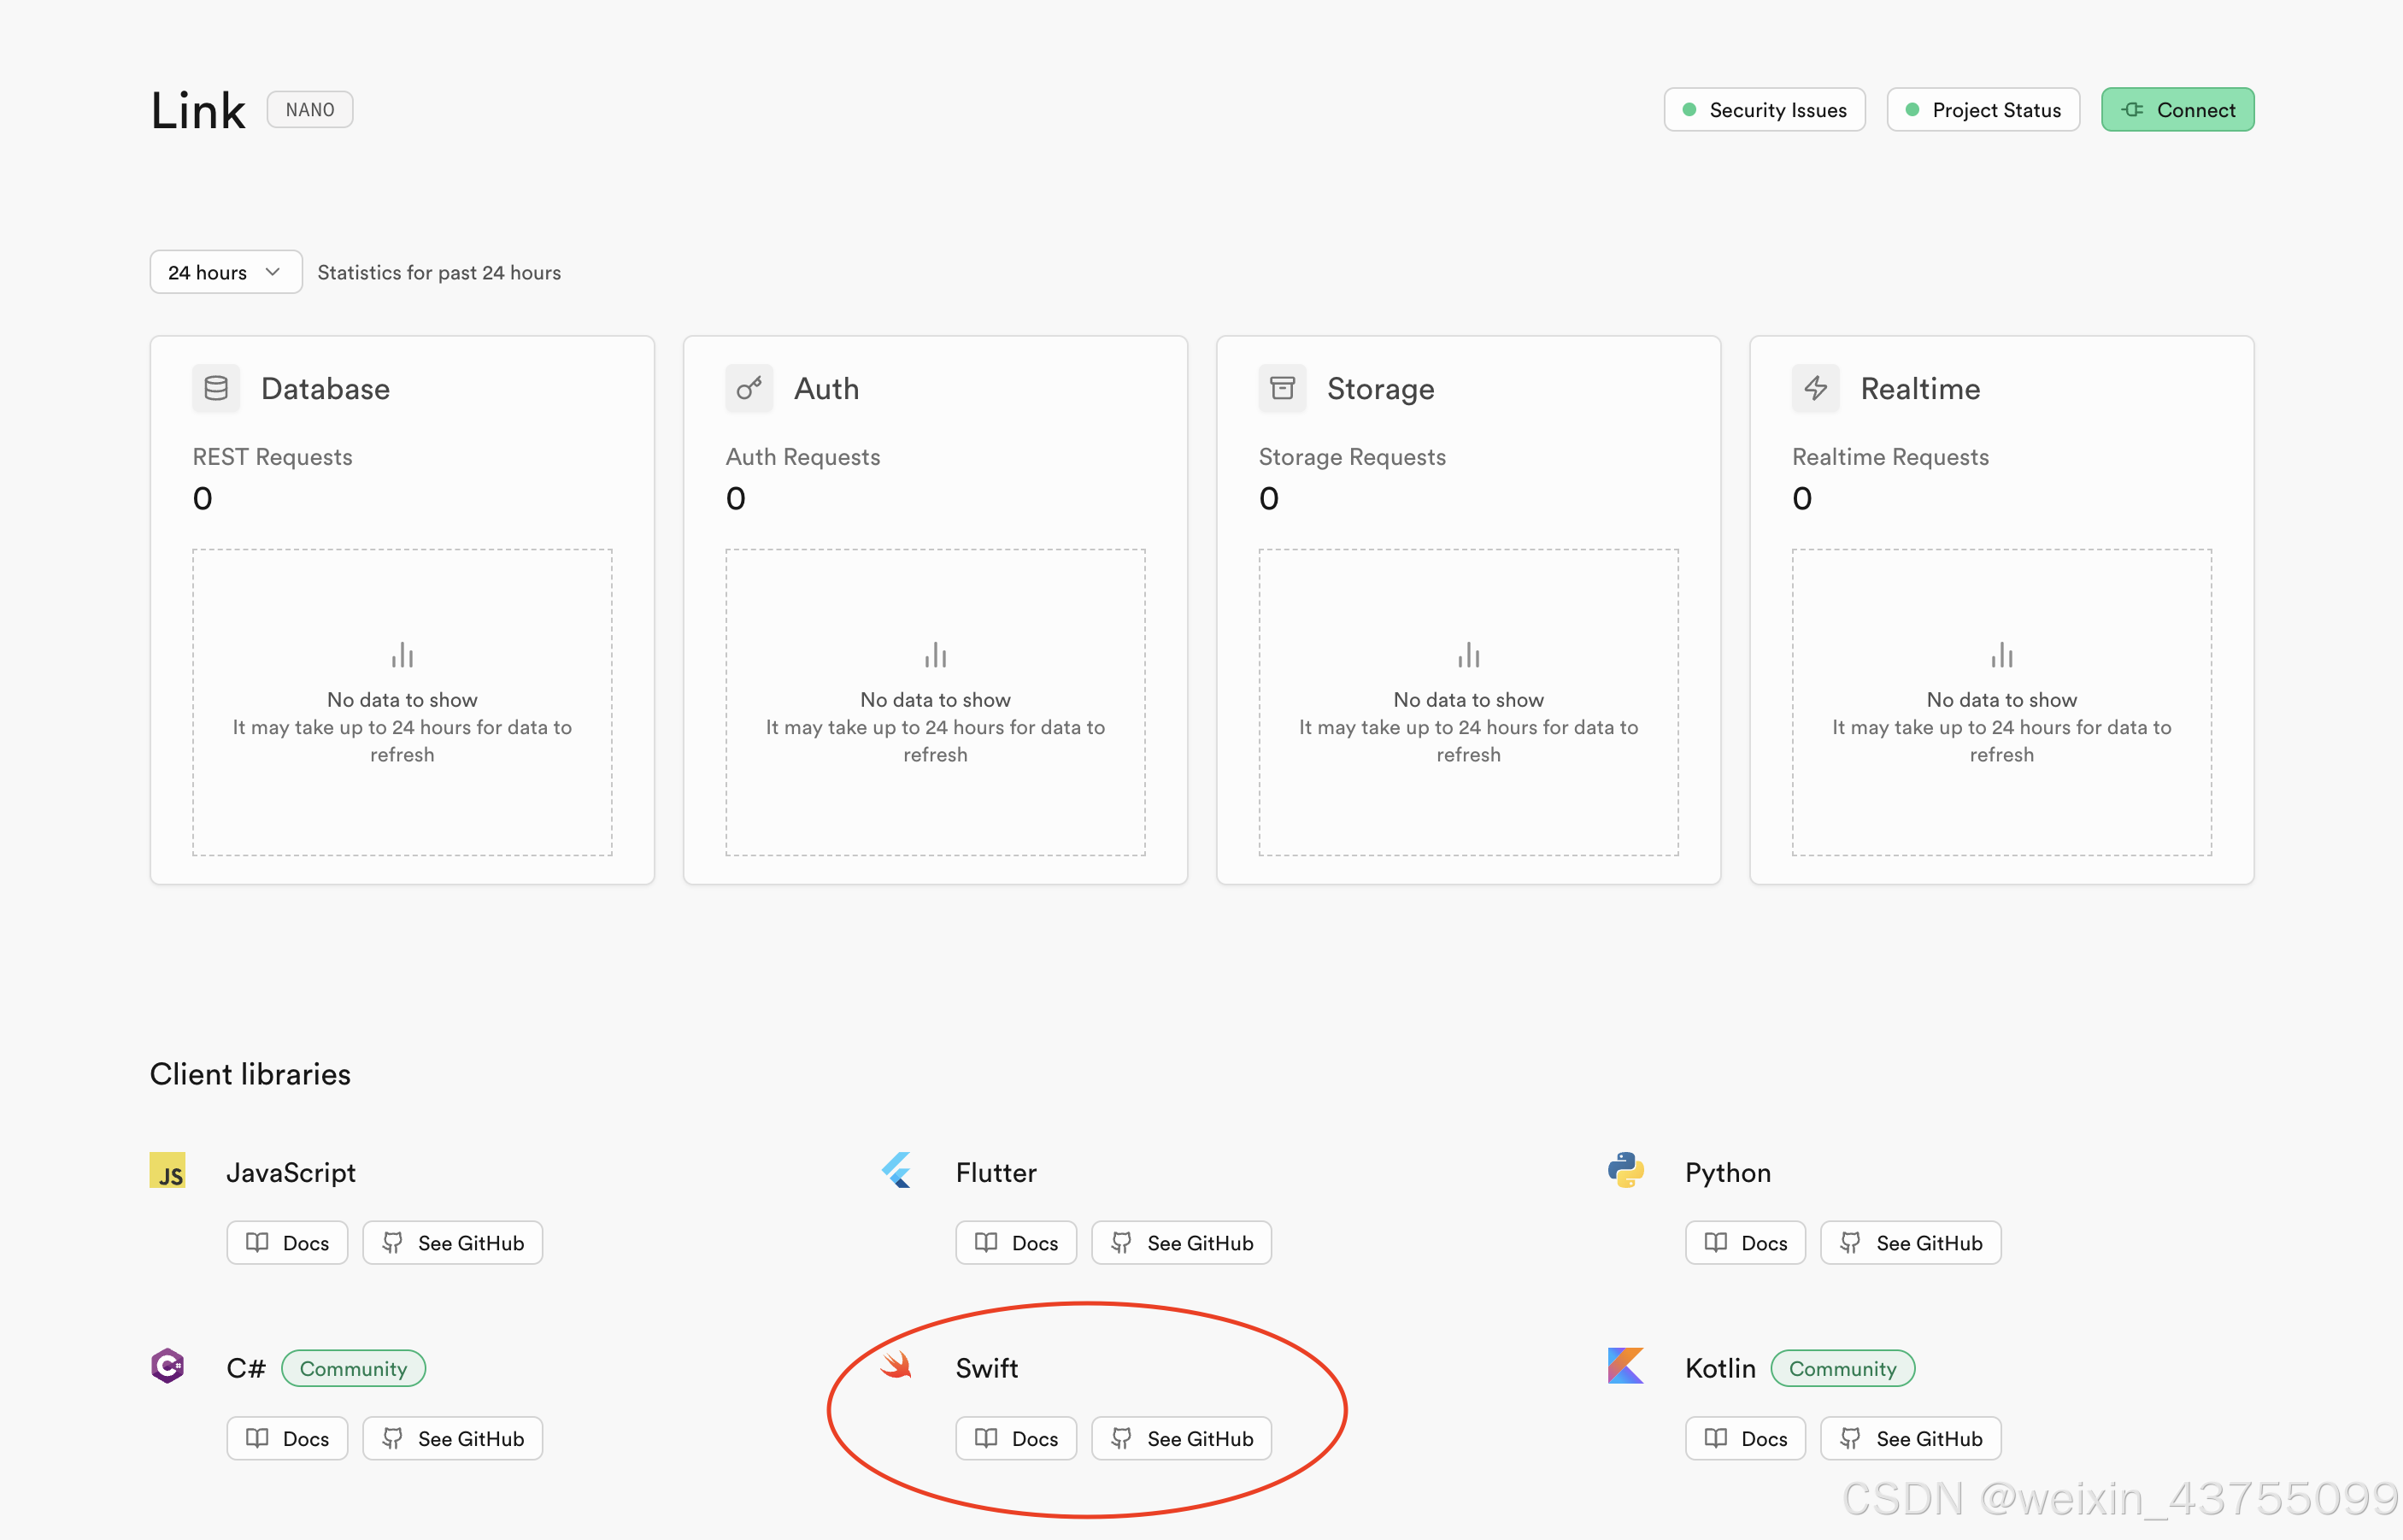
可以看到下面有一个显示Swift的地方,点开Docs可以查看官方提供的一些API文档和一些具体的业务代码,在此基础上可以进行修改,并运用到自己的App中。
在SwiftPackageManager中使用https://github.com/supabase/supabase-swift.git https://github.com/supabase/supabase-swift.git来添加Supabase相关的包。添加完毕后,可以先到官方文档的Auth模块看看具体如何使用:
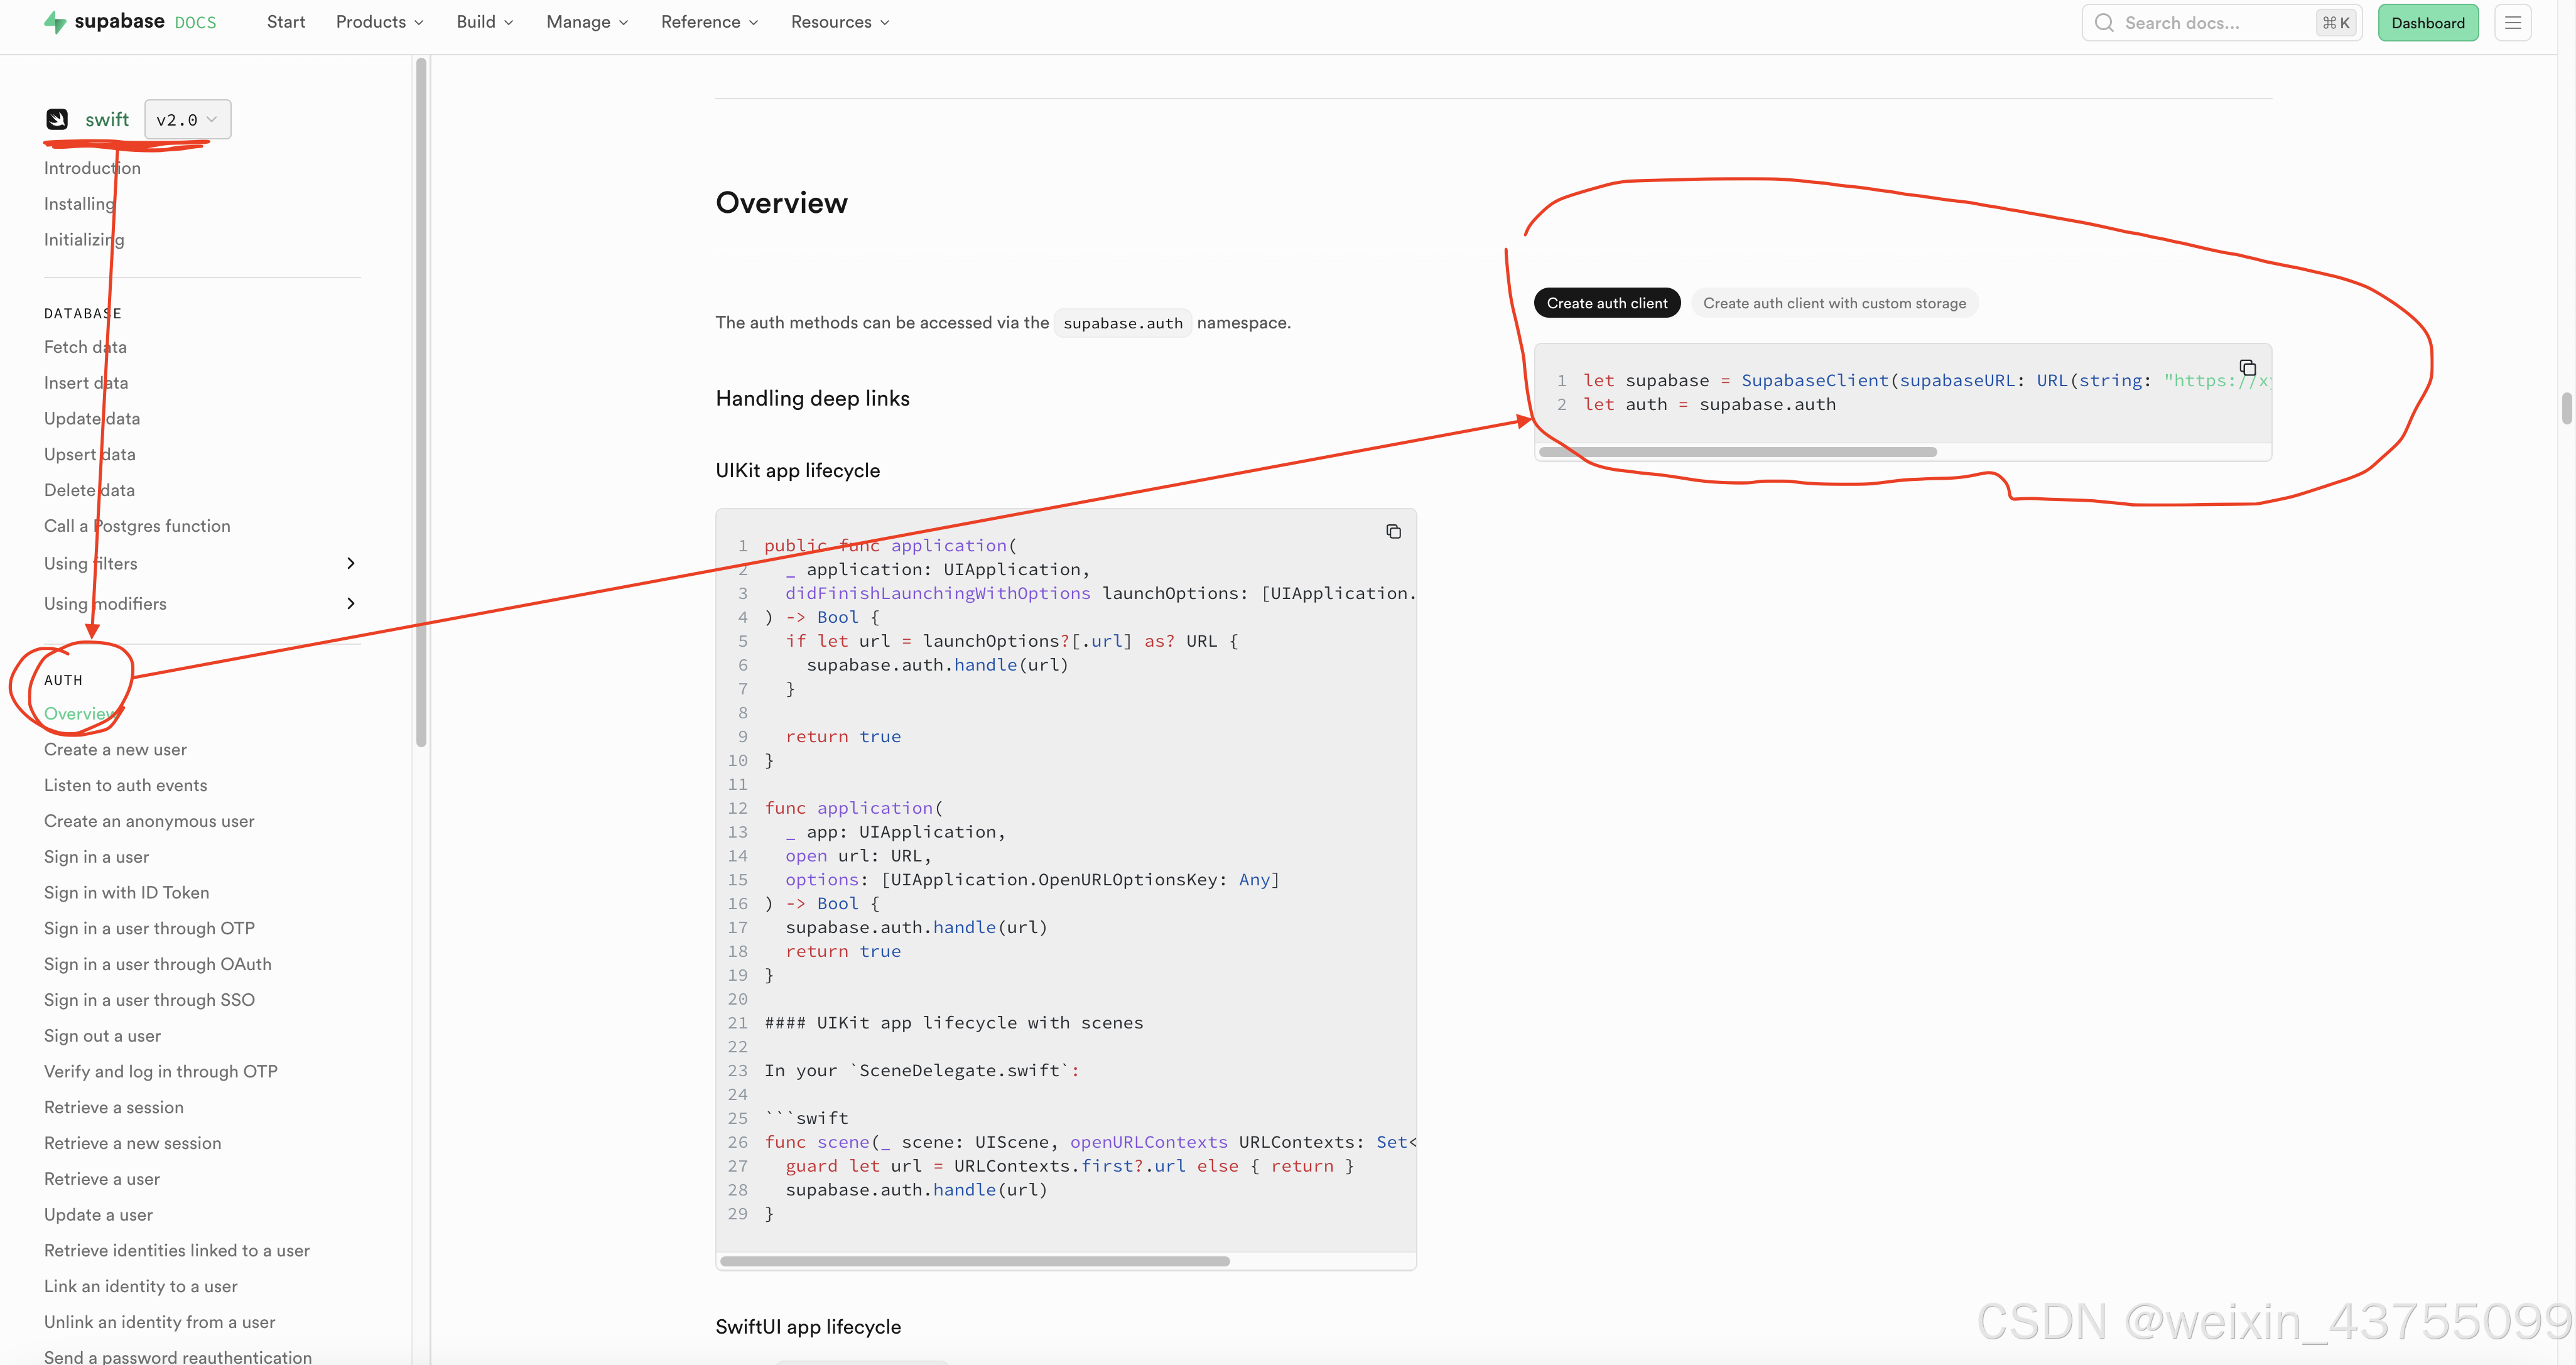
这个不对文档里的代码进行更多的赘述了,回到我的App中看一下具体怎么使用。首先我创建了一个SupabaseSharedManager:
class SupabaseSharedManager {
    static let shared = SupabaseSharedManager()

    let client: SupabaseClient

    private init() {
        let url = URL(string: "")! // 填写Supabase项目的链接
        let key = "" // 生成的Token
        client = SupabaseClient(supabaseURL: url, supabaseKey: key)
    }
}
其中的url和key可以在项目的设置找到,具体路径如下,打开项目主页->点击Connect按钮->选择Mobile Frameworks->选择Swift->即可拿到对应的值:

client的建立是后续操作其他所有Supabase功能的基础,那么接下来修改UserAuthViewModel来实现登录和注册的功能:
import Foundation
import Supabase

class UserAuthViewModel: ObservableObject {
    @Published var username: String = ""
    @Published var password: String = ""
    @Published var metadata: [String: AnyJSON] = [:]
    @Published var isAuthenticated: Bool = false
    @Published var errorMessage: String?

    private var client = SupabaseSharedManager.shared.client

    func register(username: String, password: String) {
        // 注册
        Task {
            do {
                let session = try await client.auth.signUp(email: username, password: password)
                isAuthenticated = true
                errorMessage = nil
            } catch {
                errorMessage = "Registration failed: \(error.localizedDescription)"
                print(errorMessage ?? "failed")
            }
        }
    }

    func login() {
        // 登录
        Task {
            do {
                let session = try await client.auth.signIn(email: username, password: password)
                isAuthenticated = true
                errorMessage = nil
                // 解包session.user.data
                metadata = session.user.userMetadata
            } catch {
                errorMessage = "Login failed: \(error.localizedDescription)"
                print(errorMessage ?? "failed")
            }
        }
    }

    func logout() {
        // 退出登录
        Task {
            do {
                try await client.auth.signOut()
                isAuthenticated = false
                username = ""
                password = ""
            } catch {
                errorMessage = "Logout failed: \(error.localizedDescription)"
                print(errorMessage ?? "failed")
            }
        }
    }
}
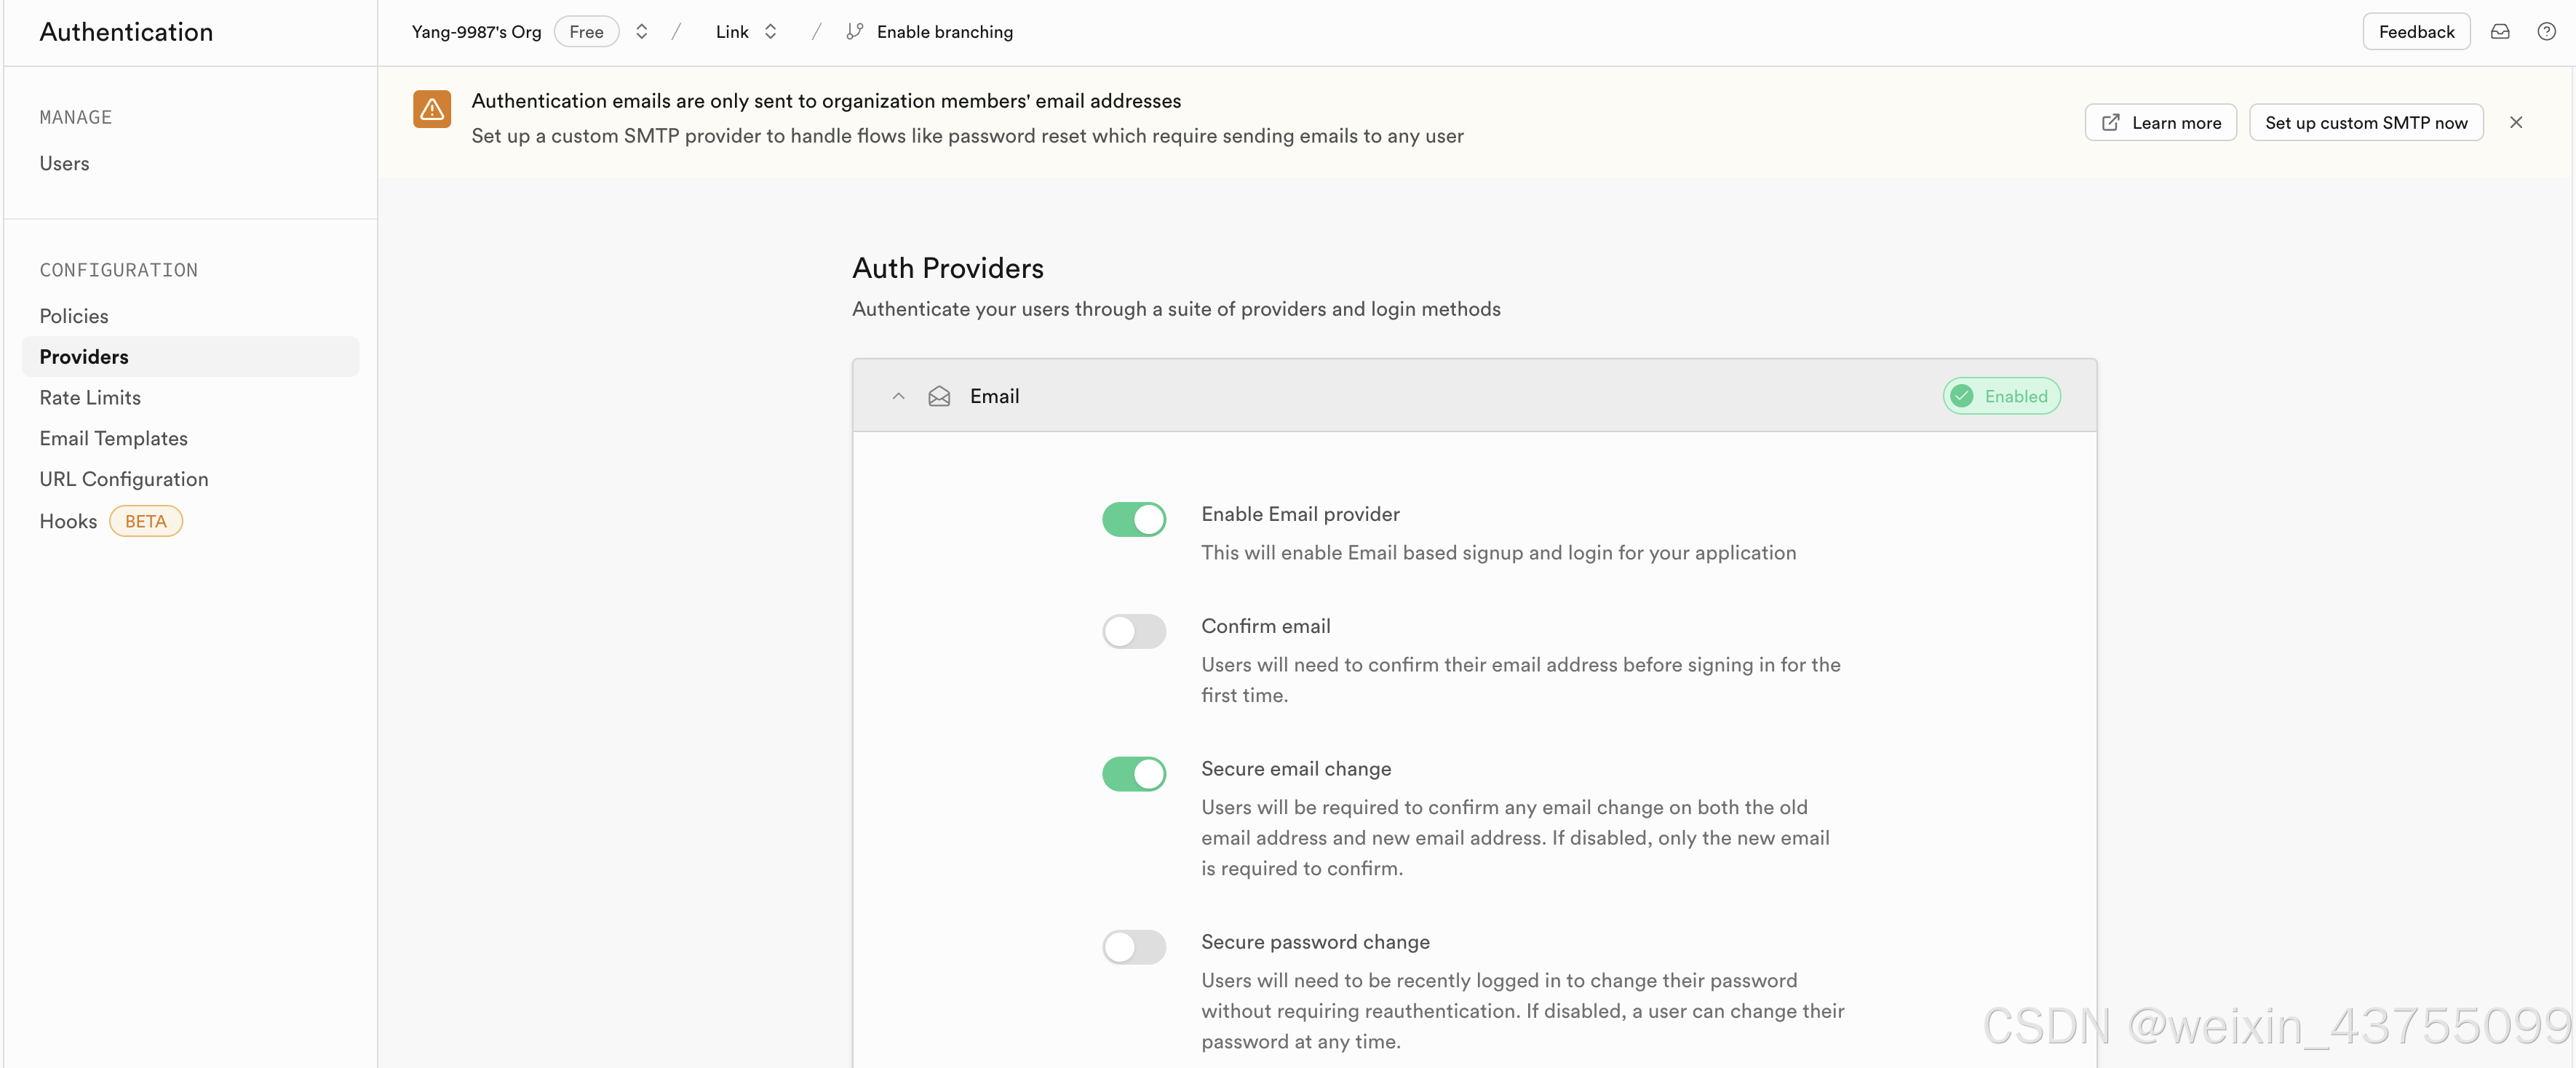
上面的代码实现了很基础的注册、登录和退出的功能,Supabase默认开启了邮箱注册,我采用的目前也是这种方式,更多的相关支持方式可以到项目的Auth模块查看一下。邮箱的注册方式默认打开了邮箱确认的功能,可以先自行关闭,等后续需要的时候再开启:
编写注册页面RegisterView:
import SwiftUI

struct RegisterView: View {
    @Binding var path: NavigationPath
    @ObservedObject var userAuthViewModel: UserAuthViewModel
    @State private var username: String = "" // 使用email进行注册
    @State private var nickname: String = "" // 昵称
    @State private var password: String = "" // 密码
    @State private var confirmPassword: String = "" // 确认密码

    @State private var registerLoading: Bool = false

    var body: some View {
        VStack(alignment: .leading, spacing: 24) {
            Text("欢迎注册!")
                .font(.title2)
                .fontWeight(.bold)
                .padding(.horizontal)

            VStack(spacing: 16) {
                TextField("用户名(邮箱)", text: $username)
                    .padding()
                    .background(Color(.systemGray6))
                    .cornerRadius(8)

                TextField("昵称", text: $nickname)
                    .padding()
                    .background(Color(.systemGray6))
                    .cornerRadius(8)

                SecureField("密码", text: $password)
                    .padding()
                    .background(Color(.systemGray6))
                    .cornerRadius(8)

                SecureField("确认密码", text: $confirmPassword)
                    .padding()
                    .background(Color(.systemGray6))
                    .cornerRadius(8)
            }
            .padding(.horizontal)

            Button(action: {
                registerLoading = true
                userAuthViewModel.register(username: username, password: password)
                // 利用逃逸闭包来处理注册成功 registerLoading = false
            }) {
                ZStack {
                    RoundedRectangle(cornerRadius: 8)
                        .fill(Color.black)
                        .frame(height: 50)

                    if registerLoading {
                        ProgressView()
                            .progressViewStyle(CircularProgressViewStyle(tint: .white))
                    } else {
                        Text("注册")
                            .foregroundColor(.white)
                            .bold()
                    }
                }
            }
            .padding(.horizontal)

            if let errorMessage = userAuthViewModel.errorMessage {
                Text(errorMessage)
                    .foregroundColor(.red)
                    .padding()
            }

            Spacer()

            HStack {
                Text("已经用于账户?")
                    .foregroundColor(.gray)
                Button(action: {
                    // 跳转到登录页面
                    path.append("Login")
                }) {
                    Text("现在登录")
                        .foregroundColor(.blue)
                }
            }
            .padding(.horizontal)
            .padding(.bottom, 20)
        }
        .padding()
        .toolbar {
            ToolbarItem(placement: .navigationBarLeading) {
                Button(action: {
                    // 返回到Welcome页面
                    path.removeLast(path.count)
                }) {
                    HStack {
                        Image(systemName: "arrow.left")
                        Text("返回欢迎页")
                    }
                    .foregroundColor(.black)
                }
            }
        }
    }
}
登录页面(LoginView)的逻辑其实和注册的差不多:
import SwiftUI

struct LoginView: View {
    @Binding var path: NavigationPath
    @ObservedObject var userAuthViewModel: UserAuthViewModel
    @State private var username: String = "" // 使用email进行登录
    @State private var password: String = "" // 密码
    @State private var isPasswordVisible = false
    @State private var isLoading = false
    @State private var showAlert = false

    var body: some View {
        VStack(spacing: 24) {
            HStack {
                VStack(alignment: .leading, spacing: 8) {
                    Text("欢迎回来!")
                        .font(.title2)
                        .fontWeight(.bold)

                    Text("很高兴再次遇到你!")
                        .font(.title2)
                        .fontWeight(.bold)
                }

                Spacer()
            }
            .padding(.horizontal, 20)
            .padding(.top, 50)

            VStack(spacing: 16) {
                TextField("请输入邮箱", text: $username)
                    .padding()
                    .background(Color(.systemGray6))
                    .cornerRadius(8)

                ZStack {
                    if isPasswordVisible {
                        TextField("请输入密码", text: $password)
                            .frame(height: 30)
                            .padding()
                            .background(Color(.systemGray6))
                            .cornerRadius(8)
                    } else {
                        SecureField("请输入密码", text: $password)
                            .frame(height: 30)
                            .padding()
                            .background(Color(.systemGray6))
                            .cornerRadius(8)
                    }

                    HStack {
                        Spacer()
                        Button(action: {
                            isPasswordVisible.toggle()
                        }) {
                            Image(systemName: isPasswordVisible ? "eye.slash" : "eye")
                                .padding(.trailing, 16)
                                .foregroundColor(.black)
                        }
                    }
                }

                HStack {
                    Spacer()
                    Button(action: {
                        showAlert = true
                    }) {
                        Text("忘记密码?")
                            .foregroundColor(.gray)
                    }
                    .alert(isPresented: $showAlert) {
                        Alert(
                            title: Text("忘记密码"),
                            message: Text("请联系开发者进行处理"),
                            dismissButton: .default(Text("OK"))
                        )
                    }
                }
            }
            .padding(.horizontal)

            Button(action: {
                isLoading = true
                userAuthViewModel.login()
                // 利用逃逸闭包来处理登录成功 isLoading = false
            }) {
                ZStack {
                    RoundedRectangle(cornerRadius: 8)
                        .fill(Color.black)
                        .frame(height: 50)

                    if isLoading {
                        ProgressView()
                            .progressViewStyle(CircularProgressViewStyle(tint: .white))
                    } else {
                        Text("Login")
                            .foregroundColor(.white)
                            .bold()
                    }
                }
            }
            .padding(.horizontal)
            .disabled(isLoading)

            Spacer()

            HStack {
                Text("还没有账户吗?")
                    .foregroundColor(.gray)
                Button(action: {
                    path.append("Register")
                }) {
                    Text("现在注册")
                        .foregroundColor(.black)
                }
            }
            .padding(.bottom, 20)
        }.toolbar {
            // 返回按钮
            ToolbarItem(placement: .navigationBarLeading) {
                Button(action: {
                    // 返回到Welcome页面
                    path.removeLast(path.count)
                }) {
                    HStack {
                        Image(systemName: "arrow.left")
                        Text("返回欢迎页")
                    }
                    .foregroundColor(.black)
                }
            }
        }
    }
}
因为要将注册页面和登录页面统一一个入口,所以用NavigationSatck用来管理导航路径:
import SwiftUI

struct WelcomeView: View {
    @ObservedObject var viewModel: UserAuthViewModel
    @State private var path = NavigationPath() // 用来管理导航路径

    var body: some View {
        NavigationStack(path: $path) {
            VStack(spacing: 40) {
                Image("LinkPage") // 自定义一个图像,显示在Welcome页
                    .resizable()
                    .mask(
                        LinearGradient(
                            gradient: Gradient(colors: [.clear, .black]),
                            startPoint: .bottom,
                            endPoint: .top
                        )
                    )
                    .ignoresSafeArea()

                Spacer()

                VStack(spacing: 20) {
                    Image(systemName: "link.circle")
                        .resizable()
                        .frame(width: 60, height: 60)
                        .foregroundColor(.black)

                    Text("Link")
                        .font(.title)
                        .fontWeight(.bold)
                }

                VStack(spacing: 16) {
                    NavigationLink(value: "Login") {
                        Text("登录")
                            .frame(maxWidth: .infinity)
                            .padding()
                            .background(Color.black)
                            .foregroundColor(.white)
                            .cornerRadius(10)
                    }

                    NavigationLink(value: "Register") {
                        Text("注册")
                            .foregroundStyle(.black)
                            .frame(maxWidth: .infinity)
                            .padding()
                            .overlay(
                                RoundedRectangle(cornerRadius: 10)
                                    .stroke(Color.black, lineWidth: 2)
                            )
                    }
                }
                .padding(.horizontal, 40)
            }
            .padding(.bottom, 50)
            .navigationDestination(for: String.self) { value in
                switch value {
                case "Login":
                    LoginView(path: $path, userAuthViewModel: viewModel)
                        .navigationBarBackButtonHidden()
                case "Register":
                    RegisterView(path: $path, userAuthViewModel: viewModel)
                        .navigationBarBackButtonHidden()
                default:
                    EmptyView()
                }
            }
        }
    }
}
这里是“一人公司”的成长家园。我们提供从产品曝光、技术变现到法律财税的全栈内容,并连接云服务、办公空间等稀缺资源,助你专注创造,无忧运营。
更多推荐

 3
3 0
0- 0


 已为社区贡献3条内容

所有评论(0)