【Keras】TensorFlow Hub 模型复用
在软件开发中,我们经常复用开源软件或者库,避免了相同功能的代码重复开发,减少了大量的重复劳动,也有效缩短了软件开发周期。代码复用,对软件产业的蓬勃发展,有着极大的助推作用。相应的,TF Hub 目的是为了更好的复用已训练好且经过充分验证的模型,可节省海量的训练时间和计算资源。这些预训练好的模型,可以进行直接部署,也可以进行迁移学习(Transfer Learning)。对个人开发者来说,TF Hu
在软件开发中,我们经常复用开源软件或者库,避免了相同功能的代码重复开发,减少了大量的重复劳动,也有效缩短了软件开发周期。代码复用,对软件产业的蓬勃发展,有着极大的助推作用。
相应的,TF Hub 目的是为了更好的复用已训练好且经过充分验证的模型,可节省海量的训练时间和计算资源。这些预训练好的模型,可以进行直接部署,也可以进行迁移学习(Transfer Learning)。对个人开发者来说,TF Hub 是非常有意义的,他们可以快速复用像谷歌这样的大公司使用海量计算资源训练的模型,而他们个人去获取这些资源是很不现实的。
一、TF Hub 网站
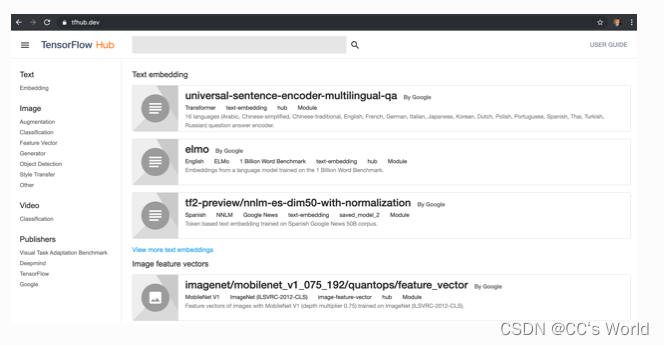
打开主页 https://tfhub.dev/ ,在左侧有 Text、Image、Video 和 Publishers 等选项,可以选取关注的类别,然后在顶部的搜索框输入关键字可以搜索模型。
以 stylization 为例,我们搜索到如下模型: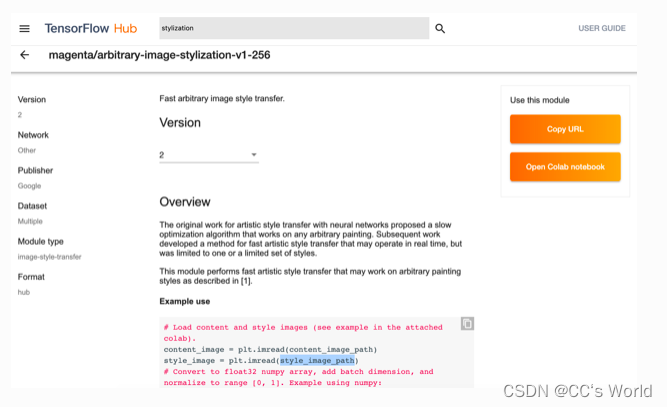
该模型的地址如下:
https://tfhub.dev/google/magenta/arbitrary-image-stylization-v1-256/2
其中,末尾的 2 为该模型的版本号。
二、TF Hub 安装
TF Hub 是单独的一个库,需要单独安装,安装命令如下:
pip install tensorflow-hub
在 TF2.0 上,必须使用 0.5.0 或以上版本,因为接口有变动。
三、TF Hub 模型使用样例
TF Hub 模型的复用非常简单,代码模式如下:
import tensorflow_hub as hub

hub_handle = 'https://tfhub.dev/google/magenta/arbitrary-image-stylization-v1-256/2'
hub_model = hub.load(hub_handle)
outputs = hub_model(inputs)
根据 stylization 模型的参考代码和 notebook,进行了精简和修改,实现了图像的风格转换功能。
import matplotlib.pyplot as plt
import numpy as np
import tensorflow as tf
import tensorflow_hub as hub

def crop_center(image):
    """Returns a cropped square image."""
    shape = image.shape
    new_shape = min(shape[1], shape[2])
    offset_y = max(shape[1] - shape[2], 0) // 2
    offset_x = max(shape[2] - shape[1], 0) // 2
    image = tf.image.crop_to_bounding_box(image, offset_y, offset_x, new_shape, new_shape)
    return image

def load_image_local(image_path, image_size=(512, 512), preserve_aspect_ratio=True):
    """Loads and preprocesses images."""
    # Load and convert to float32 numpy array, add batch dimension, and normalize to range [0, 1].
    img = plt.imread(image_path).astype(np.float32)[np.newaxis, ...]
    if img.max() > 1.0:
        img = img / 255.
    if len(img.shape) == 3:
        img = tf.stack([img, img, img], axis=-1)
    img = crop_center(img)
    img = tf.image.resize(img, image_size, preserve_aspect_ratio=True)
    return img

def show_image(image, title, save=False, fig_dpi=300):
    plt.imshow(image, aspect='equal')
    plt.axis('off')
    if save:
        plt.savefig(title + '.png', bbox_inches='tight', dpi=fig_dpi,pad_inches=0.0)
    else:
        plt.show()

content_image_path = "images/contentimg.jpeg"
style_image_path = "images/styleimg.jpeg"

content_image = load_image_local(content_image_path)
style_image = load_image_local(style_image_path)

show_image(content_image[0], "Content Image")
show_image(style_image[0], "Style Image")

# Load image stylization module.
hub_module = hub.load('https://tfhub.dev/google/magenta/arbitrary-image-stylization-v1-256/2');

# Stylize image.
outputs = hub_module(tf.constant(content_image), tf.constant(style_image))
stylized_image = outputs[0]

show_image(stylized_image[0], "Stylized Image", True)
其中, hub.load(url) 就是把 TF Hub 的模型从网络下载和加载进来, hub_module 就是运行模型, outputs 即为输出。
四、TF Hub 模型 retrain 样例
相信预预训练的模型不一定满足开发者的实际诉求,还需要进行二次训练。针对这种情况,TF Hub 提供了很方便的 Keras 接口 hub.KerasLayer(url) ,其可以封装在 Keras 的 Sequential 层状结构中,进而可以针对开发者的需求和数据进行再训练。
我们以 inception_v3 的模型为例,简单介绍 hub.KerasLayer(url) 使用的方法:
import tensorflow as tf
import tensorflow_hub as hub

num_classes = 10

# 使用 hub.KerasLayer 组件待训练模型
new_model = tf.keras.Sequential([
    hub.KerasLayer("https://tfhub.dev/google/tf2-preview/inception_v3/feature_vector/4", output_shape=[2048], trainable=False),
    tf.keras.layers.Dense(num_classes, activation='softmax')
])
new_model.build([None, 299, 299, 3])

# 输出模型结构
new_model.summary()
执行以上代码输出结果如下,其中 keras_layer (KerasLayer) 就是从 TF Hub 上获取的模型。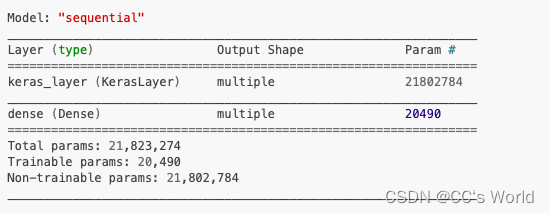
剩下的训练和模型保存跟正常的 Keras 的 Sequential 模型完全一样。
参考资料

这里是“一人公司”的成长家园。我们提供从产品曝光、技术变现到法律财税的全栈内容,并连接云服务、办公空间等稀缺资源,助你专注创造,无忧运营。
更多推荐
 2
2 0
0- 0


 已为社区贡献1条内容

所有评论(0)